Capstone Exercise
For the Capstone Exercise, you have the opportunity to create a domain (website + complete access to the webserver that powers it, so that you can install other platforms/services) of your own. A typical setup will be something along the lines of:
- GitHub:
yourusername.github.io. - Reclaim Hosting:
your-domain-name.orgoryour-domain-name.caoryour-domain-name.com.
On your blog/narrative, you may want an 'About' page where you can signal the kinds of history you're interested in, and the preferred way for people to get in touch with you. You do not have to use your real name. Remember the real names policy.
This section begins with several options you may wish to pursue for the Capstone Exercise. Following these options are resources, tutorials, and tips/hints you can reference to support the Capstone Exercise you choose. Depending on how you decided to communicate findings, this section contains resources which introduce you to the following concepts:
- Layout
- Manipulating graphics
- Design with colour and font
- Creating digital exhibits
I do not want to leave you thinking that all digital history work is necessarily text based. To that end, if you are looking for a challenge or for exposure to something rather different, I suggest you at least bookmark my series of tutorials on augmented reality, games, and 3d models for history and archaeology.
Let's get started.

'Accidental Renaissance: the photos that look like Italian paintings'.
Option 1: GitHub Pages with a Static Site Generator
Static site generators are software packages that allow you to quickly build and easily update a website via the terminal. Most static site generators use human readable programming languages like YAML/YML (Yet Another Markdown Language) that contain the settings for your website. You create a basic text file (i.e. Markdown), run a build command in the terminal that will convert your text files into web pages, and push the pages to your server.
GitHub offers each user their own unique domain attached to their account - this service is called GitHub Pages, or gh-pages. Each user domain resembles yourusername.github.io, where yourusername is your GitHub account username. If you went to yourusername.github.io right now, it will show a 404 / 'site not found' error. This is because you have not yet set-up your gh-pages website.
Like the master branch of your GitHub repository, gh-pages is another branch option. Essentially, you create a GitHub respository, populate the gh-pages branch with web files, and your yourusername.github.io will become a functioning website.
By deafault, GitHub Pages uses Jekyll, a static site generator. However, Jekyll is not the only option. Hugo is another static site generator. This workbook was built using the static site generator MKDocs. While this option shows you how to use GitHub Pages powered by Jekyll to populate your GitHub domain, the instructions are generally similar for other static site generators. You make a few changes and run the website using a GitHub repository.
- Login to your GitHub account.
- Click the button labelled
+at the top left of the page next to your account. - Select
New repository. - Under
Repository name *, enteryourusername.github.io(ensure you change 'yourusername' to your GitHub username). - Click the button labelled
Create repository. - Navigate to your DH Box account and open the terminal (you can also set this up on your own machine, in which case you open the Terminal (Mac) or Command Prompt (Windows) or GitHub desktop client).
- Type
$ git clone https://github.com/username/username.github.iointo the terminal (changing the URL to your GitHub repository path). - Type
$ cd username.github.iointo the terminal (ensure you change 'username' to your GitHub username). - Type
$ echo "Hello World" > index.htmlinto the terminal. This will pipe "Hello World" into the home fileindex.htmlof your new site. - Type
$ git add --allinto the terminal. - Type
$ git commit -m "Initial commit"into the terminal. - Type
$ git push -u origin masterinto the terminal. - Navigate to your domain at
yourusername.github.io. You will see the text "Hello World".
Customize your website
The instructions above showed you how to get you GitHub Pages domain up and running. GitHub provides further instruction on customizing your Jekyll site in their documentation. GitHub Pages makes it easy to set-up a theme.
- Navigate to your GitHub Pages repository.
- Click the tab labelled
Settings. - Scroll down to the section labelled
GitHub Pages. - Click the button labelled
Change theme. - Choose a new theme from the provided options.
- Open the
_config.ymlfile and and click the pen/pencil icon to edit the file. -
Your configuration file will show only the theme information. Add the following
YAMLconfiguration settings to you_config.ymlfile:github: [metadata] encoding: UTF-8 kramdown: input: GFM hard_wrap: false future: true jailed: false gfm_quirks: paragraph_end -
Open the
index.htmlfile and and click the pen/pencil icon to edit the file. - Change the name of the file to
index.md. -
Remove the "Hello World" message and replace it with the following Markdown header:
--- title: Home page layout: default --- Here is my home page. -
Add a commit message and click the green button labelled
Commit changes. - Navigate to your repository home page and create a new file called
2019-04-07-first-post.md(change the2019-04-07to today's date). -
Copy and paste the following text into your new Markdown file:
--- title: This is my title layout: post --- Here is my page. -
Add a commit message and click the green button labelled
Commit changes. - Navigate to your
yourusername.github.iodomain. If the site has not updated yet, wait a minute and/or clear your browser's cache.
Going Further
The instructions above show you how you can begin customizing you Jekyll website. You will probably want to change the theme and structure of the website. For instance, your blog posts should go in a folder called _posts. For more information, read Barry Clark's article on customizing your Jekyll site. You will also want to read through the Jekyll documentation.
Most static site generators use similar layouts, structures, and YAML configurations. While the documentation for each generator will differ, the general idea between all of them remains the same.
You may also want to build a simple website through GitHub Pages using the MkDocs static site generator and DH Box. Navigate to the static site generator exercise using GitHub Pages in the supporting materials.
Option 2: Jekyll Now
Jekyll is a static site generator widely used to create a website quickly that you can run from your GitHub account. Jekyll takes static Markdown files and converts them to a functioning website. While Jekyll requires some editing via the terminal, Jekyll Now is a project from Barry Clark that allows you to leverage the blogging power and simplicity of Jekyll without touching the terminal.
NB If you already have a gh-pages branch set up at yourusername.github.io, this may produce some unexpected results.
- Login to your GitHub account.
- Navigate to the Jekyll Now repository. For further instruction, follow the Jekyll Now Quick Start guide on GitHub.
- Fork the Jekyll Now repository.
- In your fork of the respository, click
Settings. - Under
Repository name, change the name fromjekyll-nowtoyourusername.github.io(ensure you change 'yourusername' to your GitHub username). By setting the name to your unique GitHub domain (i.e. gh-pages), GitHub knows to make your gh-pages domain draw from these files. - Click the button labelled
Rename. Your site is now available atyourusername.github.io. NB If you navigate to your domain URL right away, it will not be there and will show a '404' error. You first need to upload a post in the formatYYYY-MM-DD-some-text.md, ensuringYYYY-MM-DDis always the prefix to your posts file name. - Navigate back to your forked repository page.
- Open the
_config.ymlfile. - Click the pen/pencil icon to edit the file.
- Change the relevant fields (i.e.
name,description,avatar,footer-links, etc.). Foravatar, navigate to your GitHub profile, right click your profile picture/avatar, and selectView image. This will open your avatar in a new tab. Copy the URL for your avatar and paste it into the_config.ymlavatarsection. - Write a commit message and click the green button labelled
Commit changes. - Navigate to the
_postsfolder and open the2014-3-3-Hello-World.mdfile. - Click the pen/pencil icon to edit the file.
- Change the file name from
2014-3-3-Hello-World.mdto something relevant, ensuring to change the prefix to today's date in theYYYY-MM-DDformat. - Edit the file to describe your new site.
- Write a commit message and click the green button labelled
Commit changes. - Navigate to
yourusername.github.io(remember, ensure you change 'yourusername' to your GitHub username). You should now see your udpated site. If your site still shows a404error, try clearing your browser's cache and trying again. Also, ensure your post files use the proper naming convention with theYYYY-MM-DDdate prefix. - To add new posts, navigate to the
_postsfolder and click the button labelledCreate new file. Remember to use the proper naming convention with theYYYY-MM-DDdate prefix.
Going Further
After following the instructions in the previous section, you now have a functioning website that runs entirely through GitHub. You can, however, further customize your site. Read through Barry Clark's article on customizing your Jekyll site. Incorporate design and functionality in your website from the resources on this page.
Option 3: Reclaim Hosting
In the course space for cuLearn, I gave you a code to use to pay for a domain of your own. I have already purchased domain space for you from an academic web hosting service, Reclaim Hosting. This space will last for one year, at which point you have the option of paying to renew it or letting it die. Previous students in this course have used their domain to help with their applications for jobs and graduate school.
Because you have complete access and control over your domain, you can install other services as well. For instance, maybe you use Dropbox or Google Drive to sync your files across machines, or to function as a backup? You can install a service called 'OwnCloud' on your own domain that does the same thing, so that you have control over all your own materials.
- You will be asked for the name you want to have for your space. You need to be thinking of branding here. Think of a professional name that conveys something of your personality and approach to history. I for instance own the domain, 'Electric Archaeology', which I chose to convey that I'm interested in digital archaeology, but also, that I move fast and cover a lot of breaking develops in the field (Hey. It's my blog. I like the name). Please choose wisely. Some combination of your first and last name is often the best idea, since your own name is your own best calling card ('shawn graham' is such a generic name, that it was already long gone by the time I started doing digital history). Type in a name, select a top-level domain (ie. .com, .ca, .org, etc. I'll suggest .ca), and click on the 'check availability' button.
- If the pop-up says 'Congratulations, domain available!' then click on the continue button. (You may be offered free id protection, where Reclaim Hosting will hide your details is someone does a 'who-is' search on the domain name. If it does, then tick off the check box to confirm that you want this, and hit continue).
- On the next screen, (the billing screen) fill in all of the information. The balance should be $0. At the bottom left, it will also say that you’ve used a one-time promotional code. Hit the green button at the bottom to complete the purchase (which is not costing you anything).
Congratulations! You now own your very own domain. It might take a bit of time for your domain to appear live on the web. During this time, you can log into your cPanel and install Wordpress and so on - see the next section below.
Giving you a space of your own is my political act of protest against the centralization of learning inside learning management systems. Learning isn't 'managed', it's cultivated. Unlike cuLearn, I cannot monitor your activity inside your own domain. I can only see what you choose to make public. Unlike Facebook or Snapchat or Instagram, I am not trying to monetize your personality on the web.
Wordpress for your blog
Wordpress is probably the best option for a platform for writing the narrative bits of your digital history work.
- Click the 'Client area'. It will tell you that you have one active account (with Reclaim Hosting) and one active domain. When the time comes to renew your account or to close it down, this is where you do it. Note also that there is a link to 'Support', which will put you in touch with Reclaim Hosting's help desk. They are extremely fast and good at providing support; always treat any help request you make with them as if you were writing a formal email to me. Be polite and considerate, and thank them. The owners of the business often are the ones who provide the help! Without them, we couldn't do this class.
- Go to 'cPanel' - this is where you can install all sorts of different kinds of software on your account. Search for and select 'Web applications'
- Click on Wordpress. Then click on 'Install this application'.
- The next screen presents you with a number of options. Leave these set to their defaults. For 'location', leave this blank (you want to leave the directory option blank). That tells the installatron to put Wordpress at
your-domain.ca. (When/if you install other pieces of software, you'd change this variable so that the new software doesn't overwrite this software!) - Further down the page, under 'Settings', you need to change 'Administrator username', 'Administrator password', 'Website title', 'Website tagline'. This is the username and password to actually do things with your blog, and the name of your blog itself. Leave everything else alone.
- Click Install!
- Once it's done, the installer will remind you of the URL to your site, and the URL to the blog's dashboard (where you go to write posts, make changes to the look and feel of the site). Open these in a new browser window, and bookmark them. To login to your blog, remember to go to the dashboard URL (eg.
http://your-domain.ca/wp-admin), enter your blog administrator username and password. - You can close the cPanel webpage now (log out first).
Customising your blog
If you look at the dashboard for your blog, you'll see a lot of options down the left side of your screen. If you want to change the look of your blog, click on 'Appearance' then click on 'Themes'. A number of themes are pre-installed. You can click on the different themes and select 'Preview' to see how your blog might look. When you find one you like, select 'activate'. Go to the other browser window where you have your-domain.ca open. Reload the page to see the changes take effect!
If you're the sort of person who likes to sketch ideas out on paper, Lauren Heywood of the Disruptive Media Learning Lab has designed a paper-based exercise to prototype ideas. Why not give it a try? Print this PDF of Wordpress design (downloads in a new window) and follow the instructions.
To write new content, know that there is a difference between a Post and a Page. A page is a new link on your site, while posts appear in chronological order on a page, with the most recent on top. Most themes show the most recent post by default, and pages appear in any menus on the site. When you are logged into your blog any post or page will have an 'Edit' button at the bottom that you can click. You'll then be presented with an editing box with the standard toolbar across the top (allowing you to change the font, insert images, change the alignment of the text and so on). At the top right will be a button to save or publish/update the post/page.
Your blog will have a default 'about' page. Change that default text now to reflect something about who you are and why you are taking this course.
To create new pages, you click on the 'Pages' link in your dashboard and select 'Add new'.
To create new posts, you click on the 'Posts' link in your dashboard and select 'Add new'.
Explore the options for your blog; customize and make the space your own.
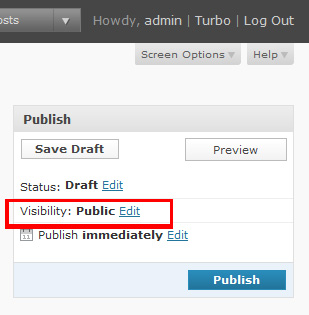
Password protected posts: If for any reason you feel that you don't want a post to be viewable by the web-at-large, you can hide it behind a password. At the top right where the 'Publish' button hides, click on 'Visibility' and select 'Password protected'. Remember though: you'll have to share the password with me for grading purposes.
For more information about controlling visibility of your posts and so on, visit the Wordpress content visibility help page.
Collecting your own annotations on your blog
Hypothes.is has an API that allows you to do some neat things. 'API' stands for 'Application Programming Interface', which is just a fancy way of saying, 'you can write a program that interacts with this web service'. Kris Shaffer, a professor at the University of Mary Washington, has written a plugin for Wordpress that allows you to automatically collect annotations you make across the web and to display them all on a single page on your blog. So, we'll go get that plugin and install it on your blog:
Open Kris Shaffer's Hypothes.is aggregator in a new browser window.
- Click 'Clone or Download' (the green button at the top right).
- In the pop-up, click 'Download ZIP'
- Go over to the dashboard for your blog (if you closed this, you can get there again by opening a new browser window and going to
your-domain.ca/wp-admin). - In the dashboard, click on Plugins >> Add New.
- Click 'Upload Plugin'. It will open a window asking you to find and select the zip file you downloaded. This is probably in your 'Downloads' folder. Select and click Ok.
- Once it’s uploaded and installed, click 'Activate'.
- In the dashboard, click on 'pages' then add a new page. Call it 'Web Notes' or 'Annotations' or something similar.
- Shaffer has created a 'shortcode' that tells Wordpress to go over to Hypothes.is and grab the latest information. So, in the text of your new page (in the editor window, make sure to click the 'text' button or else this won't work), enter the shortcode that will grab all of your public annotations:
[hypothesis user = 'kris.shaffer']where you remove thekris.shafferand put in your own Hypothes.is username. - Hit the 'Publish' button. Wordpress will report that the page has been published and give you a link to it; click on this link to see your new always-updating list of annotations! Of course, if you haven't made any public annotations yet, nothing will display. Go annotate something, then come back and reload the page, but remember to annotate using our HIST3814o group.
Layout
'Layout' can mean different things in different contexts. A general overview on issues in layout is covered by 'What makes a design great', Lynda.com (requires sign-up for free trial) and 'Exploring principles of layout and composition' (requires sign-up for free trial). The Slideshare on effective layouts gives you a sense of things to watch out for as well.
For academic posters in particular, consider these poster design suggestions from the APA.
In essence, good layout makes your argument legible, intuitive, and reinforces the rhetorical points you are trying to make. You should take into account 'principles of universal design' — consider design issues with PowerPoint and websites (although some of the technical solutions proposed in those two documents are a bit out of date, the general principles hold!).
If you decided to communicate findings via a poster, following are some hints/tips for designing a poster or modifying an existing poster.
Inkscape
View the Inkscape exercise in our supporting materials for a gentle introduction to the software.
- Download one of the scientific poster templates from Ugo Sangiorgi (These are developed from Felix Breuer's blog post; note his discussion on design).
- Open it in Inkscape.
- Make notes in your open notebook from the point of view of layout: what elements of the design work? What aren't working? How would you repurpose this poster to fit the requirements of the assessment exercise (remember, the details in the syllabus)?
- Visit Inkscape's website for help with the basics of Inkscape.
- Modify the poster, and upload the SVG, PDF, or PNG version to your repository.
PowerPoint
There's a lot of information out there on making posters with PowerPoint.
- Read parts 1, 2, and 3 of the Make Signs tutorial and then consider Colin Purrington's advice. Once you've read and digested the material, pick a poster from Pimp My Poster that sticks out to you.
- Make notes in your open notebook: from the point of view of layout what elements of the design work? What aren't working? How would you repurpose this poster to fit the requirements of the assessment exercises (remember to visit GitHub for the details)?
- Grab a template from from Colin Purrington's website, and use it to prototype a poster that works.
- Upload the poster as a PDF to your repository.
If you want to explore layout in the context of webpage creation, I would point you to the the roster of lessons at Codeacademy. Same instructions: find an existing site that you will consider from the point of view of what works, what doesn't, and use that reflection to guide the construction of your own.
Typography
Typography plays an important role in visual communication. It can do everything from reduce eyestrain (do a search for 'easiest fonts to read on screen') to communicate power and authority. Is it any wonder that strong bold capitals come to be known as 'Roman'? But first: are you a comic sans criminal?
NB Serif fonts are sometimes not as accessible as sans-serif fonts. Older screens and monitors can have a difficult time rendering serif fonts. Sans-serif fonts can be more readable across different screens. However, this does not mean you should throw away serif fonts — many serif fonts can be quite accessible and add to your design goals if used properly. For more information on accessible fonts, check out WebAIM's article on the topic.
If you decided to communicate findings via a poster, website, or anything involving design, below are some hints/tips for the proper use of typography:
- I want you to read and understand the section on font choices from the Owl at Purdue.
- Then, play some rounds of Typeconnection. Pay attention to why — or why not — various pairings work.
- Then, I want you to consider what typographic pair would work best for the Capstone Exercise?
- Finally, the following tutorial shows how you can make a webpage that uses your paired fonts and explains why they work.
The first part of this section then is to find a pair of fonts and to understand why they work best for you.
-
Read the materials above, and once you're done with the Typeconnection site, go to Google Fonts and search for a pair that are suitable for your purpose.
-
When you find a font you like, click the 'Add to collection' button.
-
At the bottom of the screen, you'll see a link for 'use'. Click on this — Google will ask you if you want to use any of the variants of the font. Tick off accordingly.
-
Do you see the embed code that Google provides, and the code to integrate the font into your CSS (stylesheet)? Leave this window open — we're going to use it in a moment.
-
Make a new repository on GitHub.
-
In your repository, click the button beside 'branch'.
-
In the search box that opens, type in
gh-pages. This will create a version of your repository that can be served as a website. You're now in the gh-pages branch. -
Click on the + sign (plus sign) beside the repository name. This will create a new file in your gh-branch of your repository. Call it
myfontchoice.html(the.htmlfile name is important to specify; otherwise your browser will not know how to render your page). -
You now need to put some HTML in there. I've written a simple webpage that will use two fonts from Google Fonts, and then applies the font to my text depending on whether or not it is a header, which you specify like this:
<h1> this is a header in between header tags </h1>or a paragraph, which you specify like this:<p>blah blah blah a paragraph of text blah blah blah</p>. Right-click and open in a new tab my webpage on GitHub. Copy the HTML into your new HTML document. Commit your changes (ie. save).
-
Let's see what we've got. To see the website version of your gh-pages branch, you go to
<yourusername>.github.io/<reponame>/myfontchoice.html(ie. the final part of the URL is the name of the document in your repo). Do that now. You should see a simple webpage, with two very distinctive fonts. -
Now let's slide your font choices into the HTML. Go to your HTML page in your gh-pages repo (ie. not the
github.ioversion, but thegithub.com/<yourusername>/<repo>/myfontchoice.htmlversion). -
Hit the edit button. Look closely at line 6. Do you see my two fonts? Do you see the pipe character (the
|symbol) between them? That tells Google you want both fonts. -
Navigate to the Google Fonts page again to grab the exact name for your fonts (uppercase letters make a difference!) and paste them into line 5 appropriately.
-
Lines 8 and 14 specify which font to use for headers, and which font to use for body text. Change the lines appropriately.
-
Change my silly text for a paragraph that explains what the fonts are, and why they work for this purpose. Commit your changes.
-
Go to the
github.ioversion of your repository (if you forget the address, you can find it under the 'Settings' tab on your normal repository page when you're in the gh-pages branch). -
Reload the page several times to clear the older version you've already looked at and to replace it with your version. Ta da! Not only have you thought carefully about typography and fonts, you've also learned how to serve a webpage from a GitHub repository.
Hint: For basic HTML, W3schools has a really good guide to keep around.
Going further with GitHub Pages
Now that you have learned the basics of creating a simple website using GitHub, you have the ability to go further. Using the DH Box, you can build a simple website through GitHub Pages using the MkDocs static site generator. Navigate to the static site generator exercise using GitHub Pages in the supporting materials.
Colour
There's a lot of bumpf out there on the 'pyschology of colour'. Google it to see what I mean (Youth Designer has a good example). A lot of what you see here isn't so much psychology as it is associations (and indeed, western associations, at that). Associations are important of course; you don't want to undermine your message by making some unfortunate connections.
If you decided to communicate findings via a website, below are some hints/tips for the proper use of colour:
- One where the colours support the broader message of the page.
- And the other where the colours undermine that broader message.
- Explain, in both cases, how your colour choices enhance and/or detract.
- Alternatively, you can make a one page slide in PowerPoint doing the same thing.
Resources
Below is a graphic and a video tutorial from Lynda.com (requires sign-up for free trial) to help with the theoretical side of things:

Visit the tutorial Understanding the rules of color, Lynda.com (requires sign-up for free trial)
To learn how to style your webpage appropriately, you can follow this tutorial on CSS from codeacademy.com.
Below is a graphic that presents how colours are perceived in different cultures:

Creating an online exhibit with Omeka
Omeka is an open source Content Management System (CMS) for sharing digital collections and creating media-rich online exhibits. A CMS is a web program that manages web content including graphics, text, videos, and more. A CMS allows users to upload their content via a Graphical User Interface (GUI) and organizes it into appropriate folder structures. Traditional websites are programmed from the ground up — everything from structure, to styling, to creating folders and specifiying where multi-media content is located.
The main advantage of using a CMS is that it requires little to no actual background-level programming. That being said, anyone can edit a CMS's source code files, add their own, or modify them to fit their needs. Most CMSs are built with PHP, a web scripting language used to dynamically create content. However, most CMSs are also accompanied by massive native and third party plugin libraries that allow users to modify their website without touching any source code. Examples of CMSs include Wordpress, Drupal, Grav, Known, Joomla, and many more.
Unlike many popular CMSs, Omeka is not a blogging platform. Omeka is used to create online exhibits. Today we are going to create a simple online exhibit.
Our overall steps are as follows:
- Create a subdomain of your website where Omeka will live. This will allow you to host Omeka as an entity of its own on your website, keeping your main website separate.
- Install Omeka through cPanel on Reclaim Hosting.
- Create an online exhibit with several historical items.
- Change the style of our Omeka site by modifying the CSS of our theme.
Creating a subdomain
-
Login to your Reclaim Hosting account through the Reclaim Hosting login page.
-
In the client area, select the cPanel tab.

-
Under the Domains section, select Subdomains. Typically, a subdomain divides your overall website into distinct portions. For instance, you could have your landing page at
mysite.com, your blog atblog.mysite.com, and your class work athist3814.mysite.com. That way each subdomain could have different styles and serve different purposes, but still be connected to your overall domain. You can add as many subdomains to your site as you'd like.Subdomains are essentially just an easier way of organizing your files and showing distinct differences from your main domain. You could technically also do
mysite.com/blogormysite.com/hist3814. In that case, however, it seems expected they would all be styled similarly tomysite.com. Furthermore, it might cause file structure issues to have, for example, Wordpress running yourmysite.comand Omeka runningmysite.com/Omeka. It's best to stick with your free subdomains.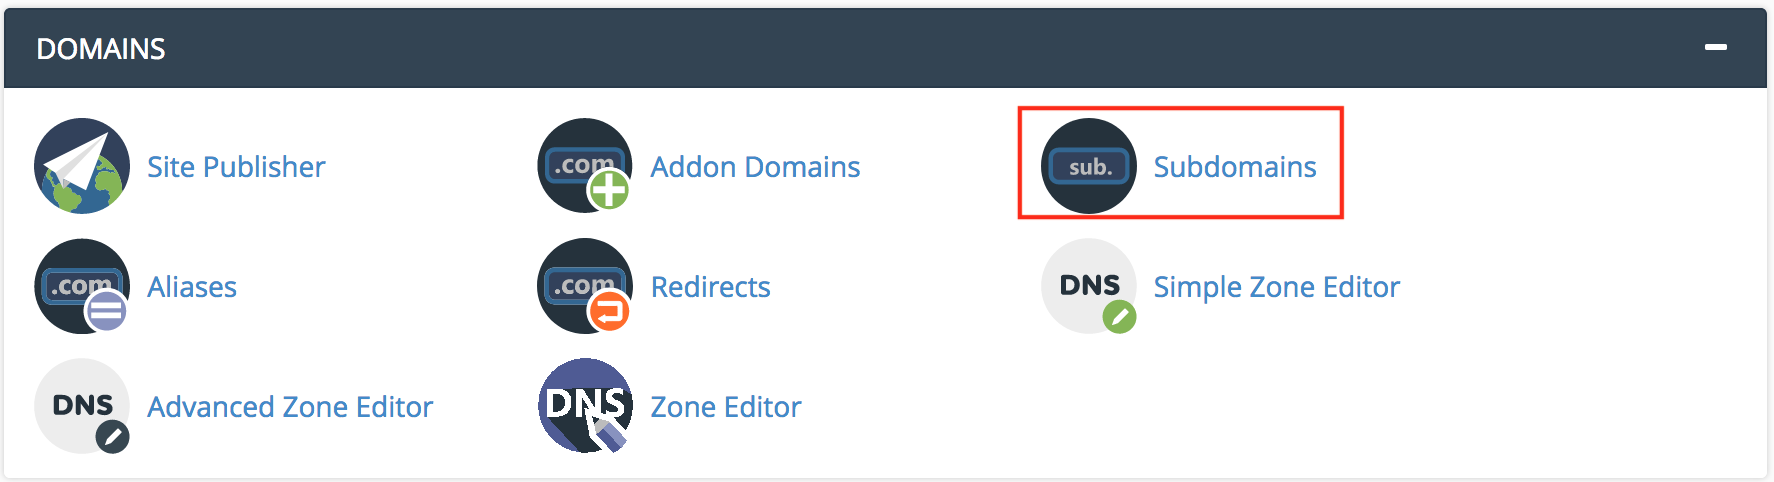
-
Enter the name of your online exhibit in the Subdomain field. You could simply put
omeka,omeka-test, etc. or get more descriptive and saygatineau-fire-maps. Choose a title relevant to your Omeka site's purpose. -
Leave the Domain field set to your domain.
-
The Document Root will be automatically created (an advantage of adding a subdomain!). I would not recommend changing this, but if you want to further organize your folder structure, you are able to change the location.
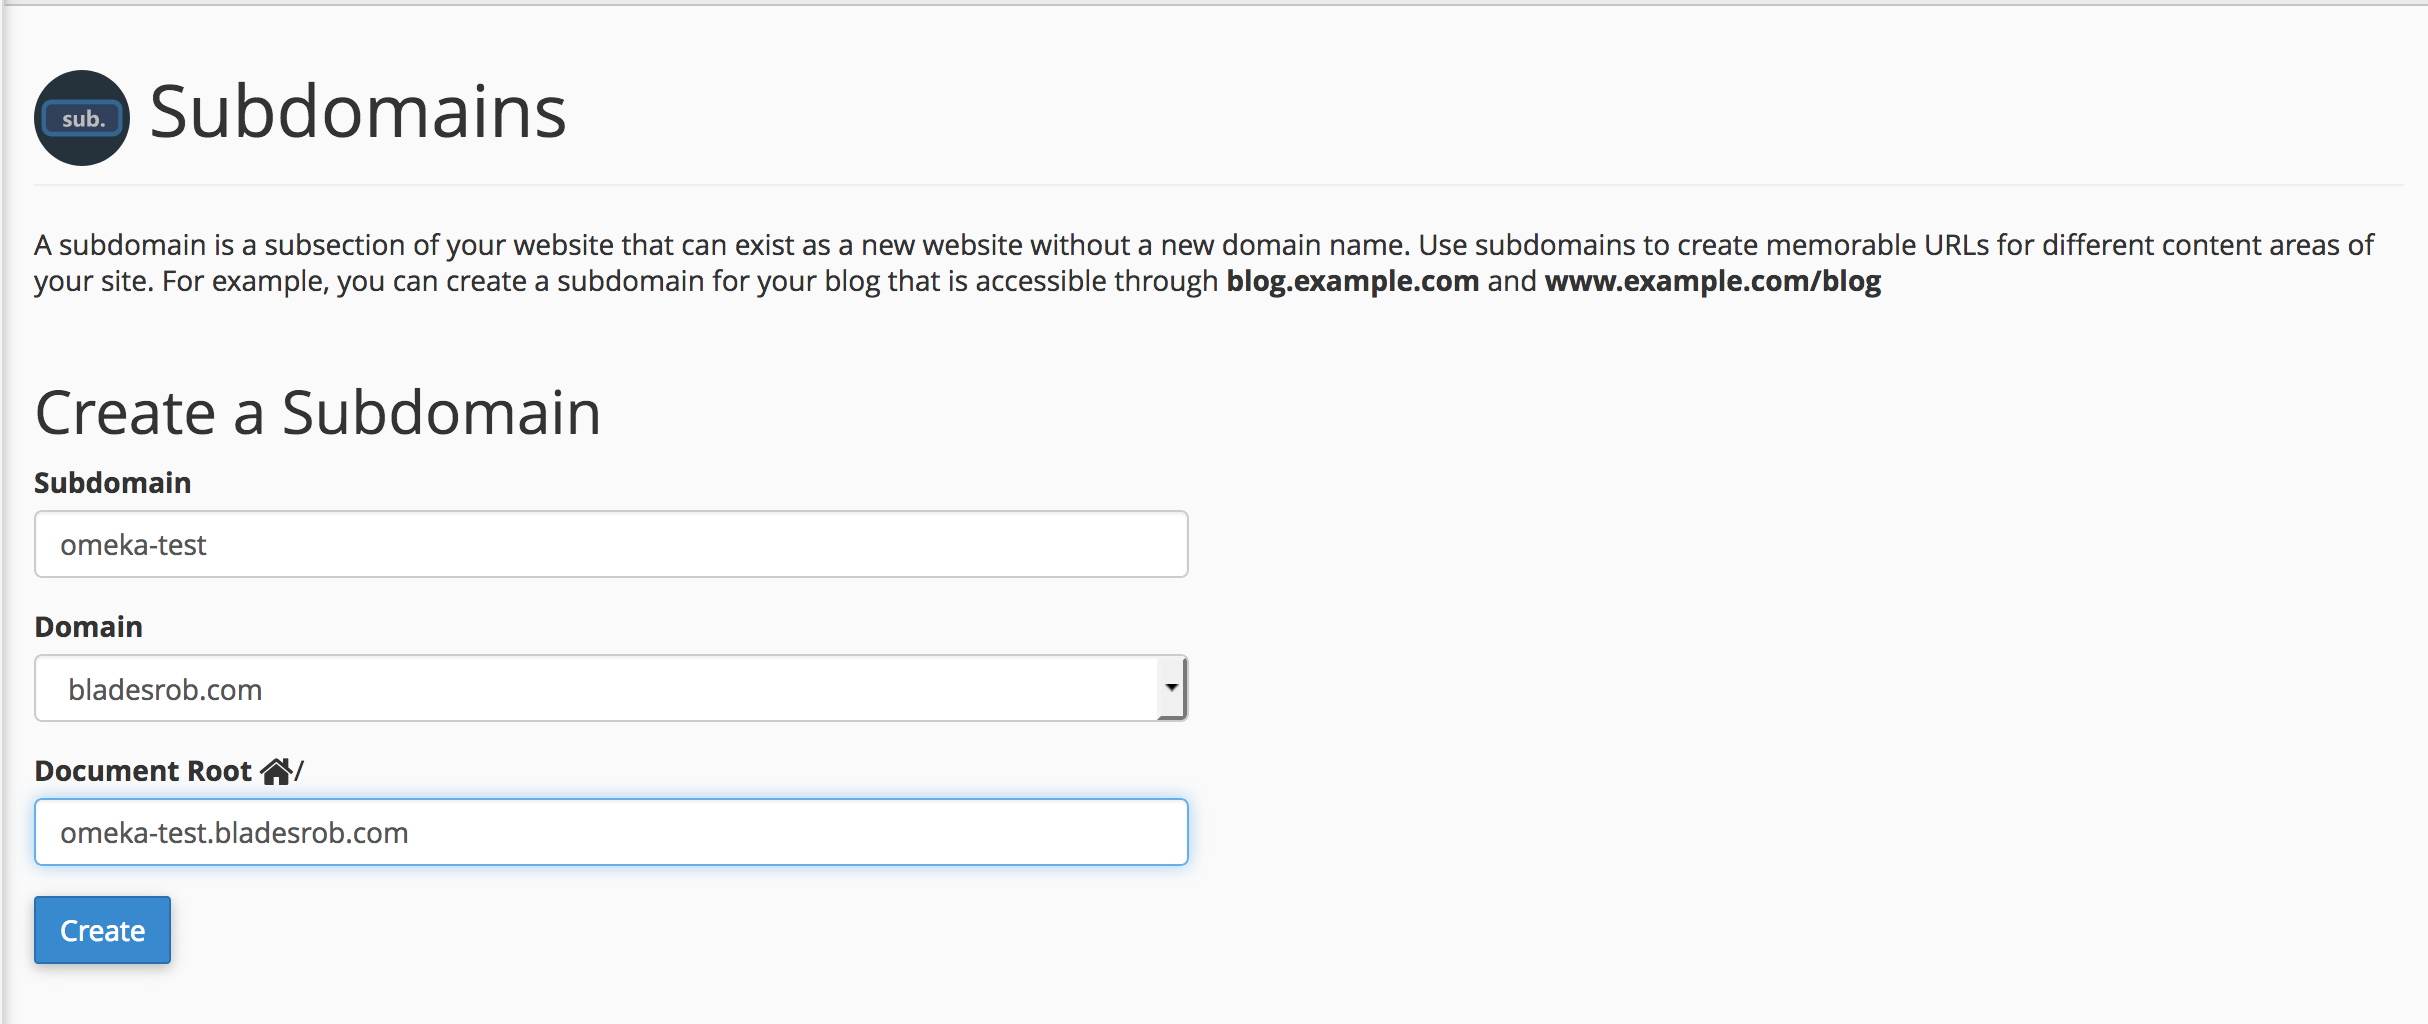
-
Click the Create button. It will take a moment, but your new subdomain will be approved.
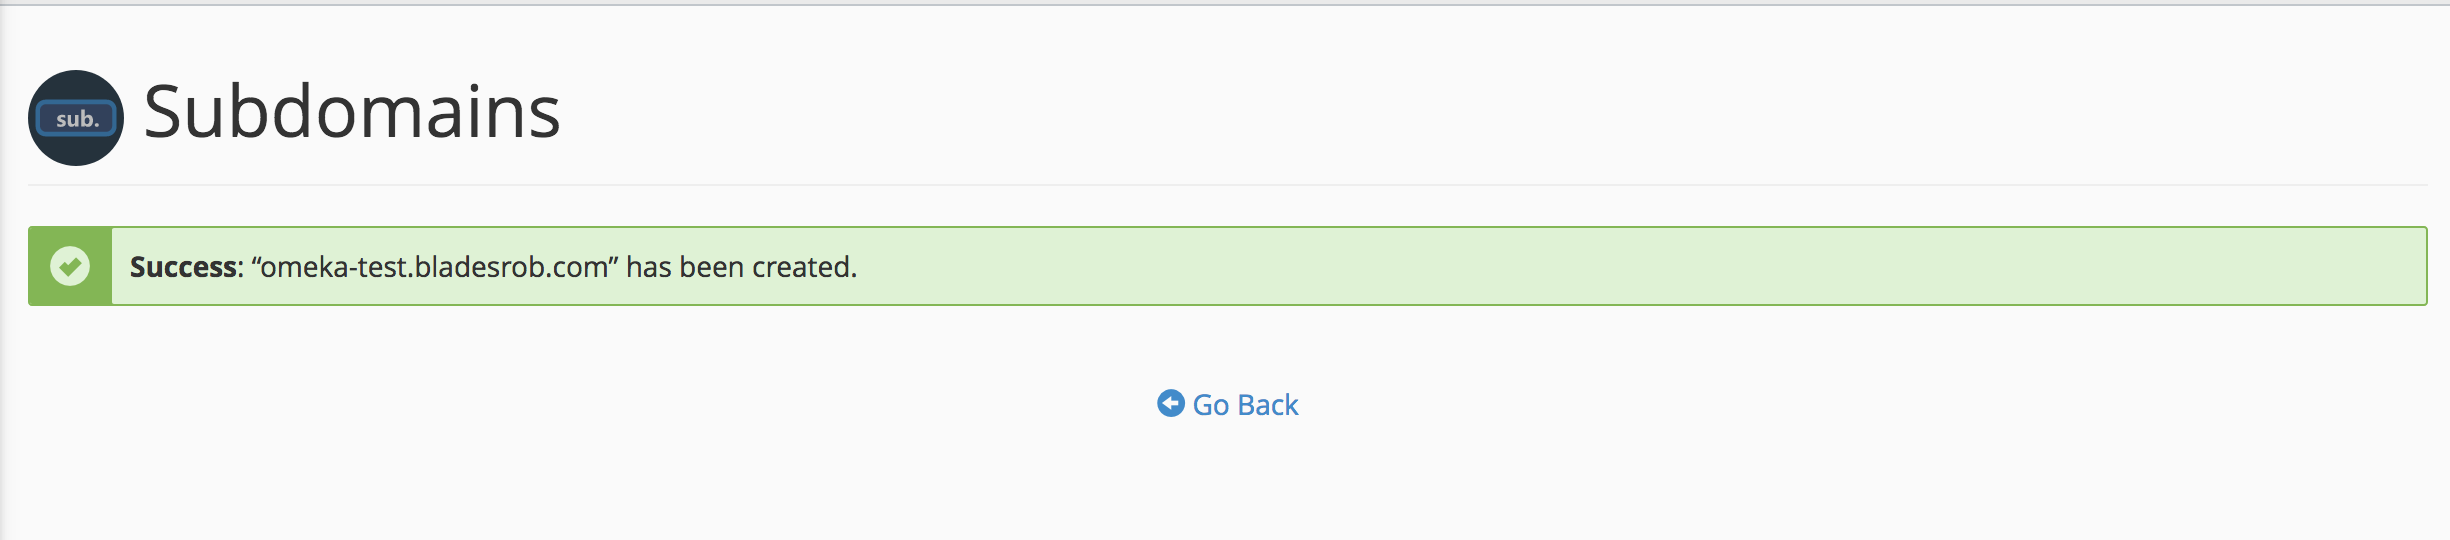
NB Since the subdomain has nothing in it, if you navigate to it now, you will see 'Index of/' showing the file structure. This is normal.
Installing Omeka
-
Navigate back to your cPanel home page.
-
Under the Applications section, select Omeka.
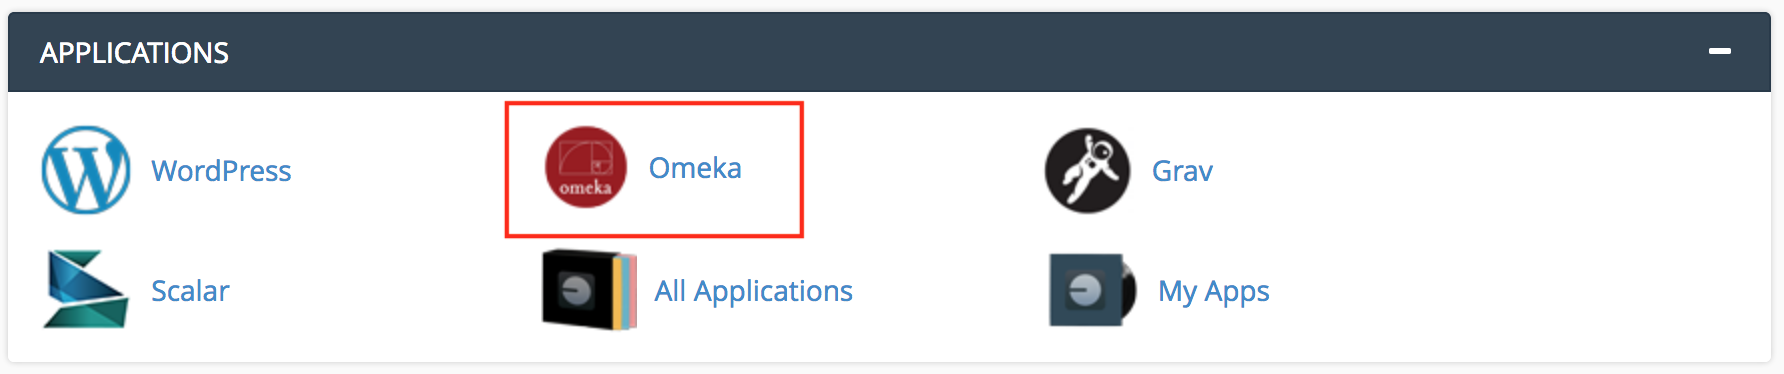
-
On the right side, click the '+ install this application' button.
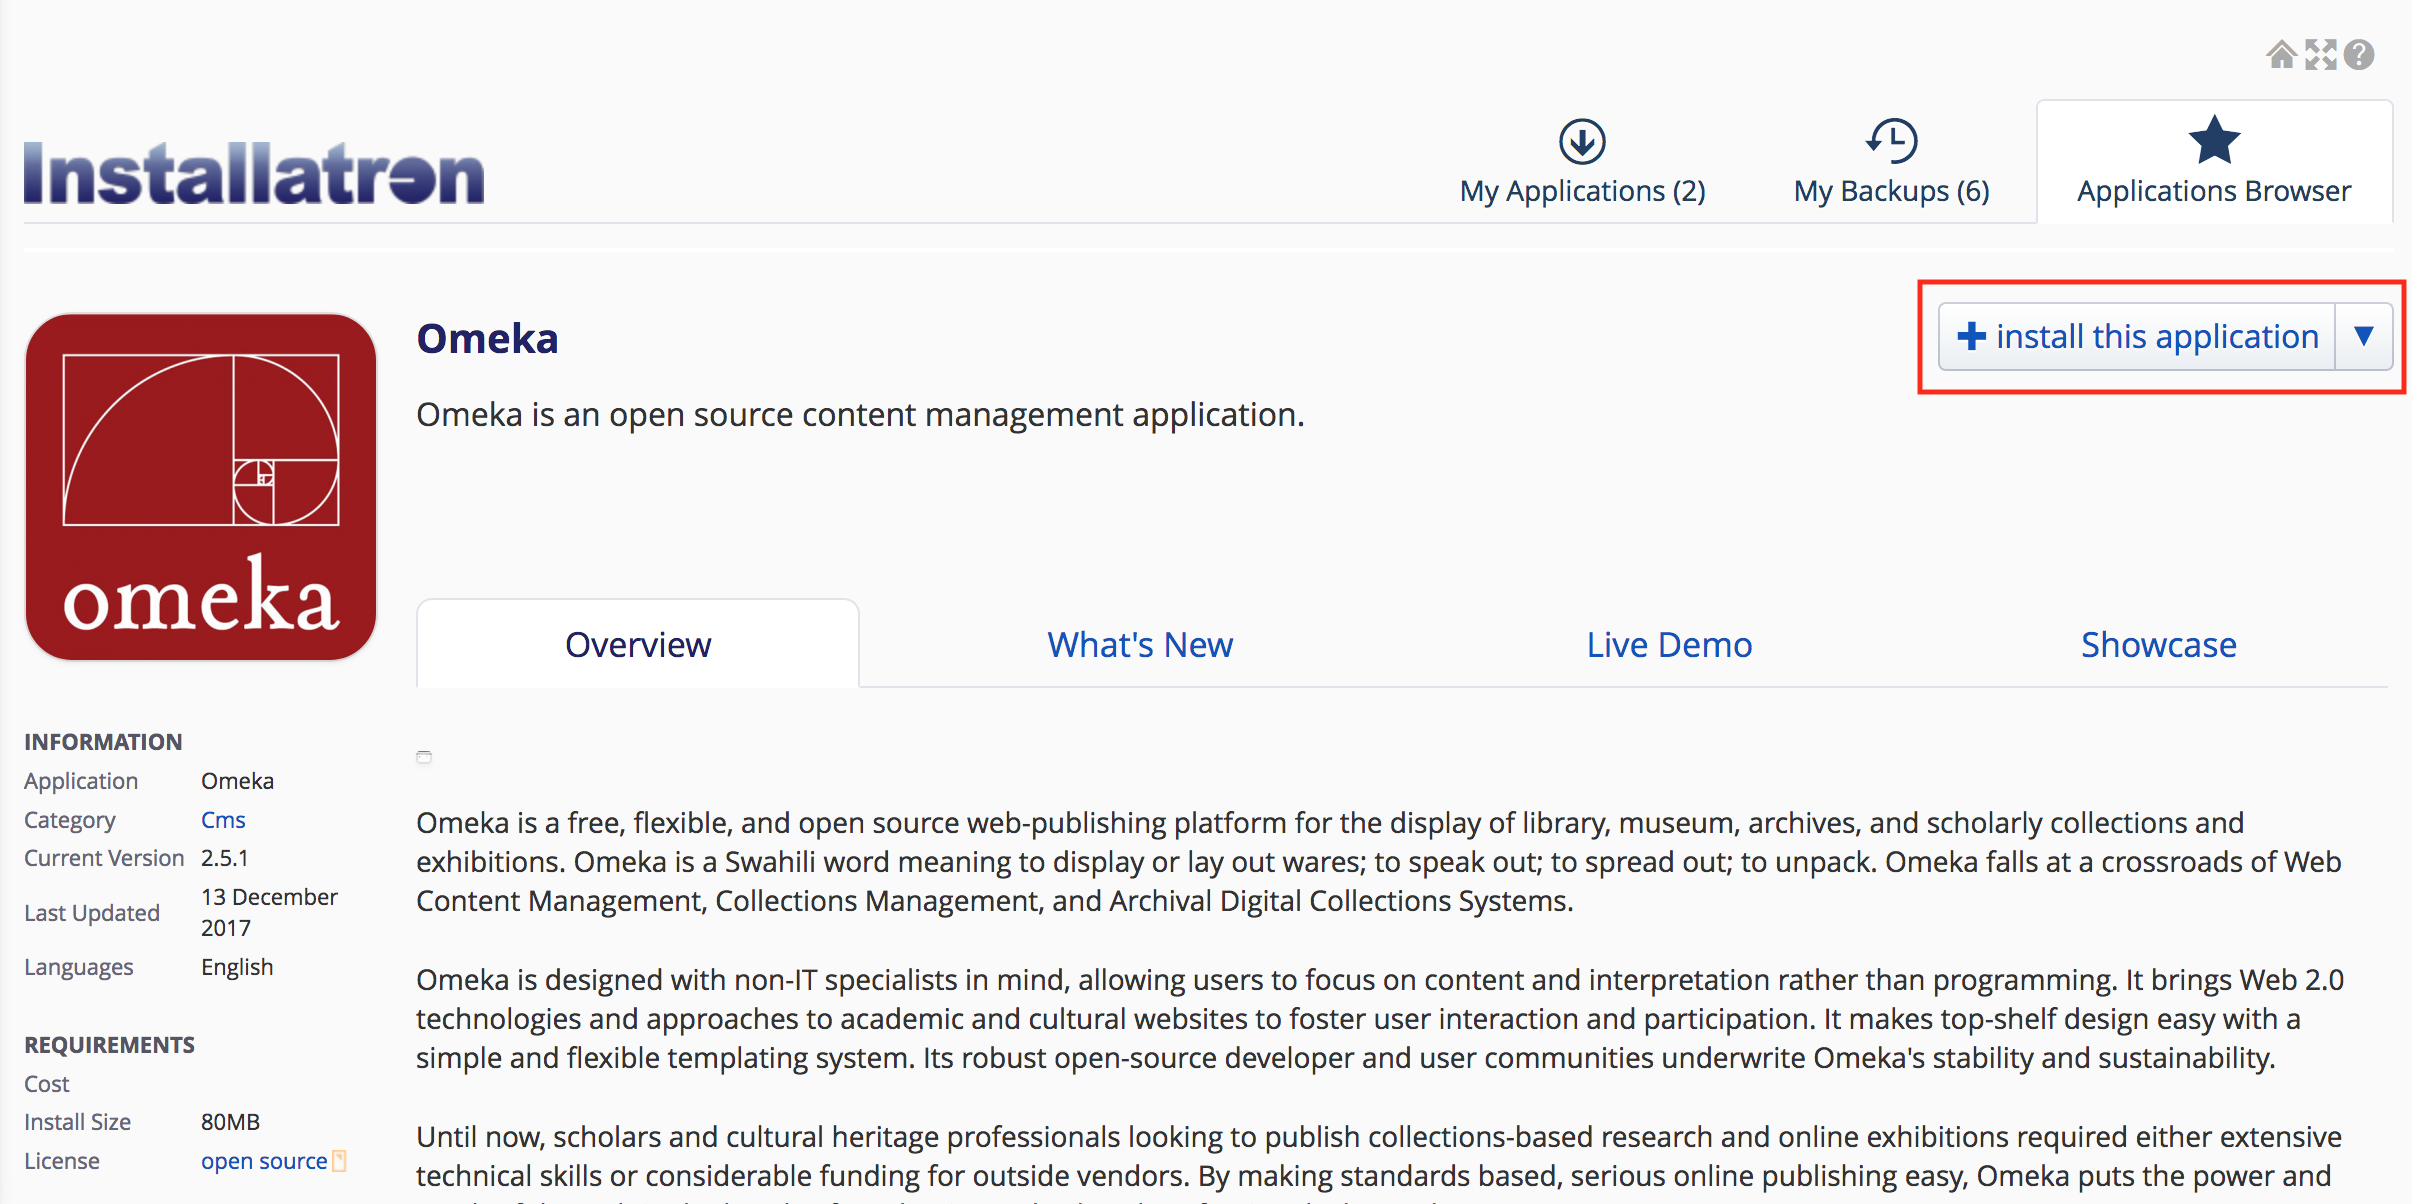
-
Under the Location section, select the subdomain you created in the previous instructions. Do not choose your main
mysite.comdomain. Choose youromeka.mysite.comdomain or your variant of it. You can choose thehttpsorhttpversion. Note, however, thathttpsis more secure. -
Delete
cmsunder Directory (Optional). We want Omeka installed to the root of our subdomain, not in a folder calledcms. If you were installing Omeka to your main site, then you'd want a subdirectory calledcms.
-
Under the Version section, leave the settings as they are. Make sure 'I accept the license agreement' is selected. It's also good practice to allow it to update as needed and to allow backups.
-
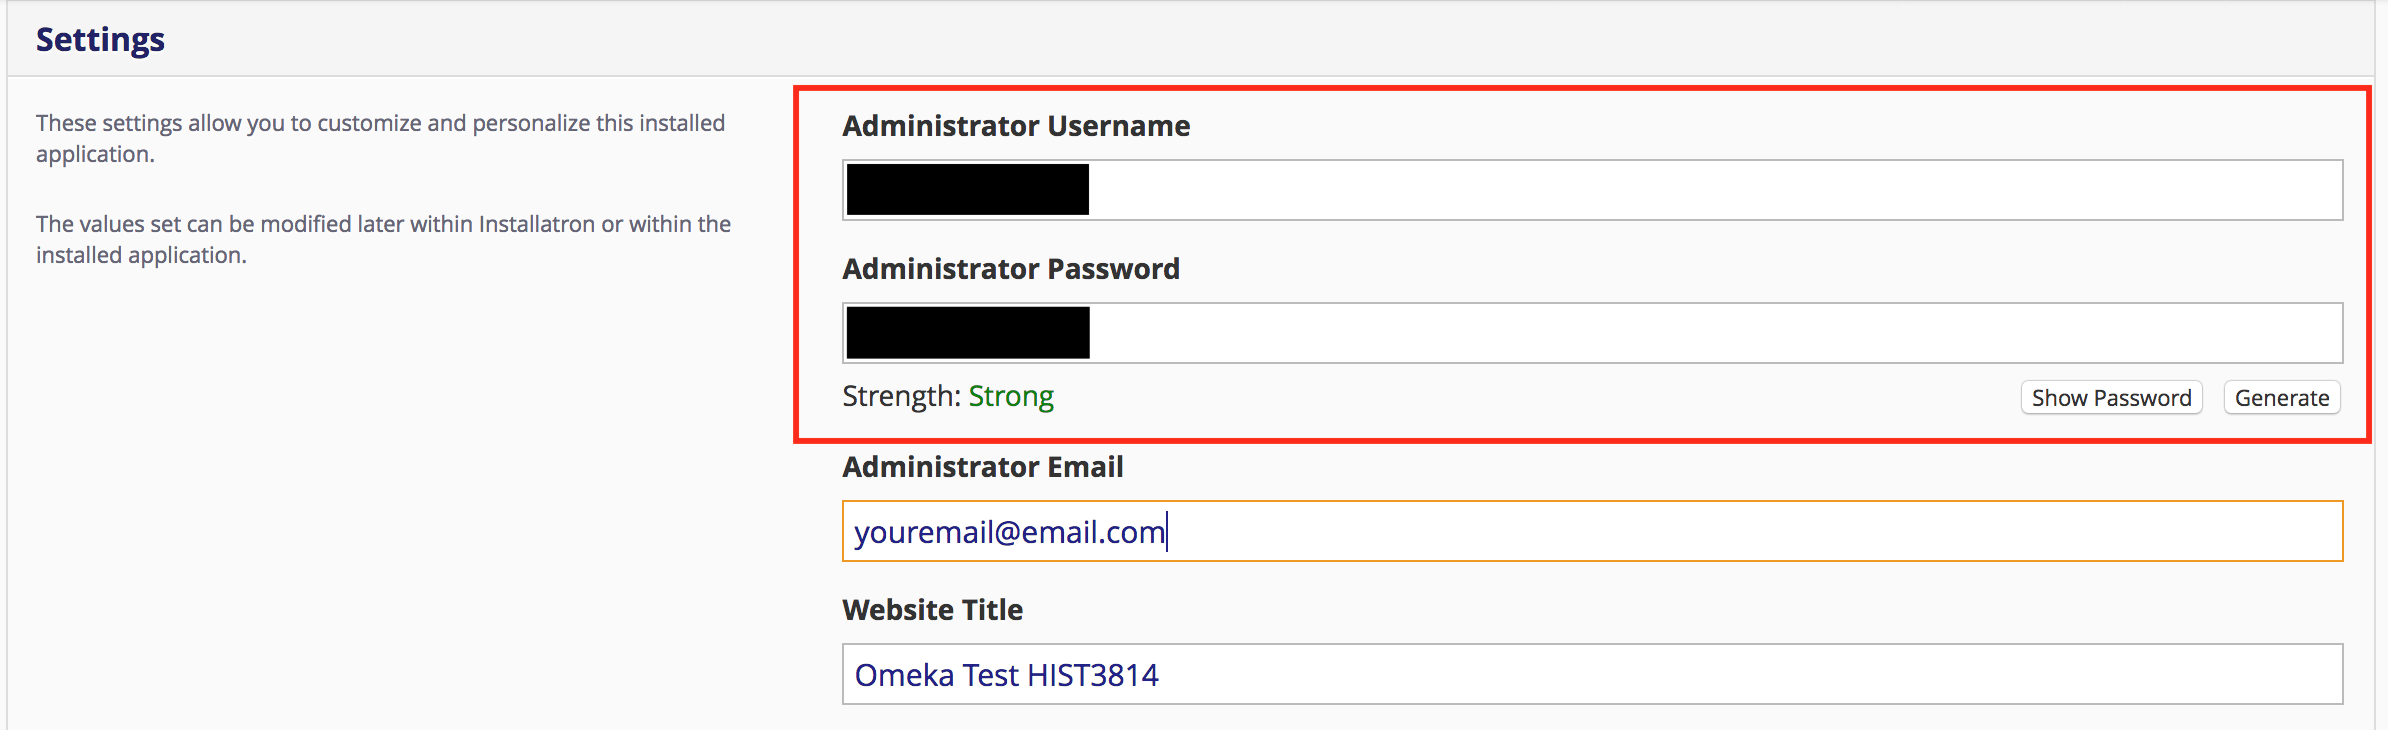
Under the Settings section, either create a new Administrator Username and Administrator Password or securely record the Administrator Username and Administrator Password generated for you. (You can click Show Password to show it.) REMEMBER YOUR LOGIN INFORMATION! You NEED the username and password to make changes to your Omeka site.
-
Add an Administrator Email.
-
Change the Website Title to a fitting and appropriate title.
-
Under Advanced, leave the default settings.
-
Click the Install button. You will be redirected to 'My Applications'. The installation may take a minute to process.

-
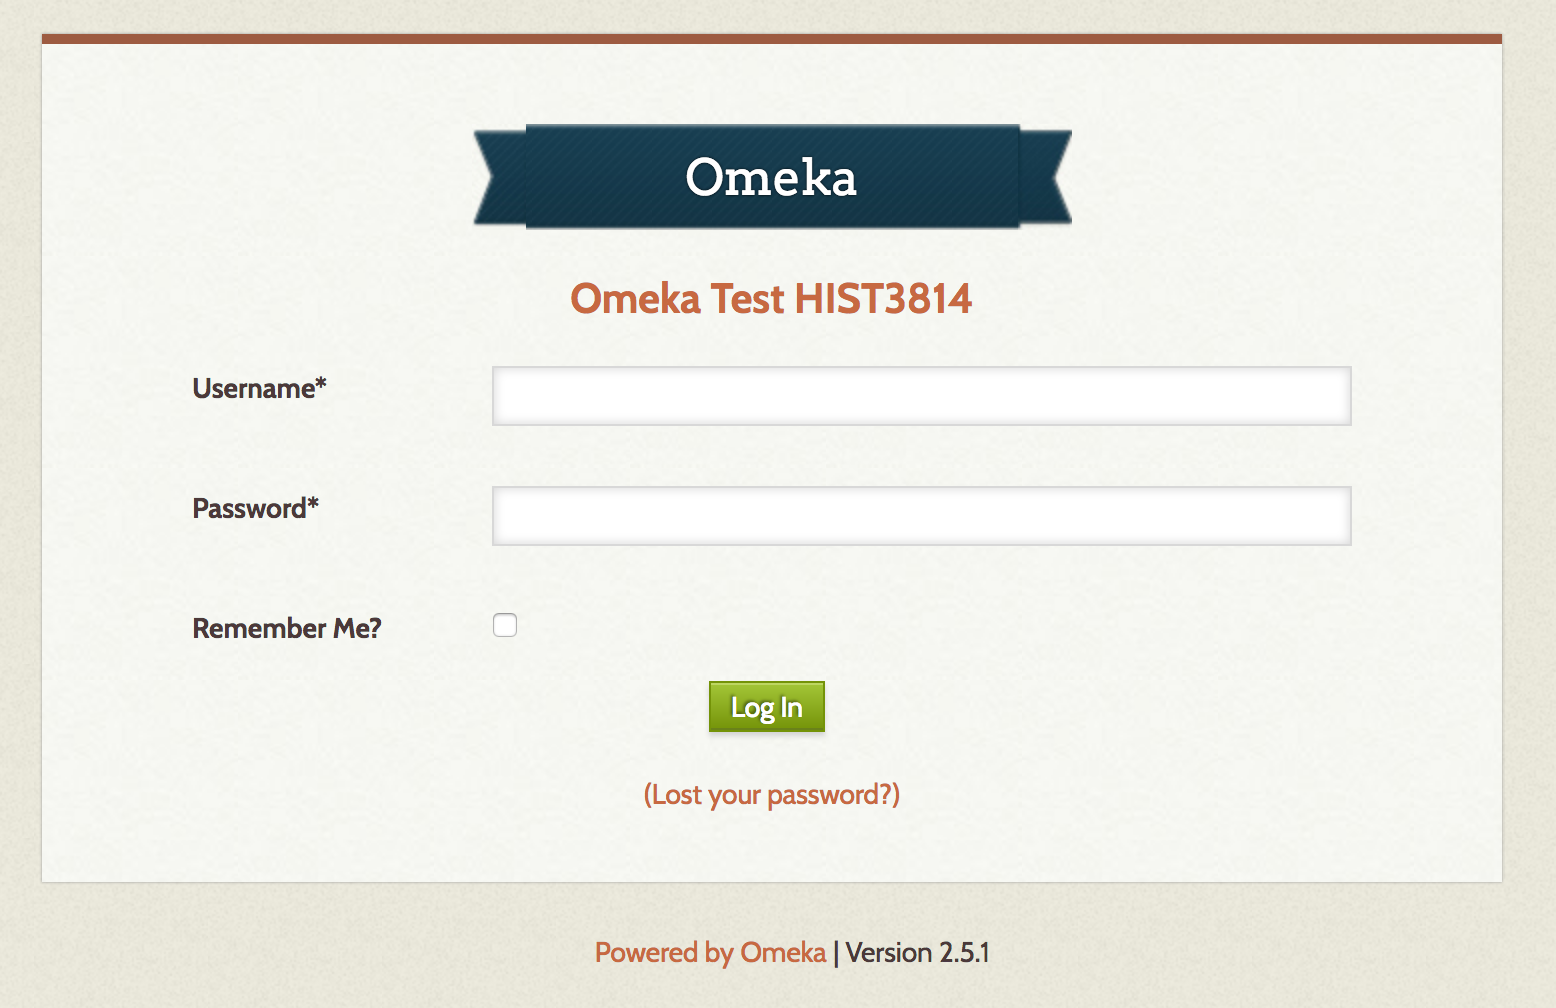
Select the middle link of your new Omeka application that says
omeka.mysite.com/adminor your variant of the subdomain.
-
Login using your Administrator Username and your Administrator Password.
-
At the top of the admin page, click on Settings.
-
Scroll down to the bottom. In the ImageMagick Directory Path field, type
/usr/bin. Reclaim Hosting comes with ImageMagick preinstalled. ImageMagick resizes and generates thumbnails of your images.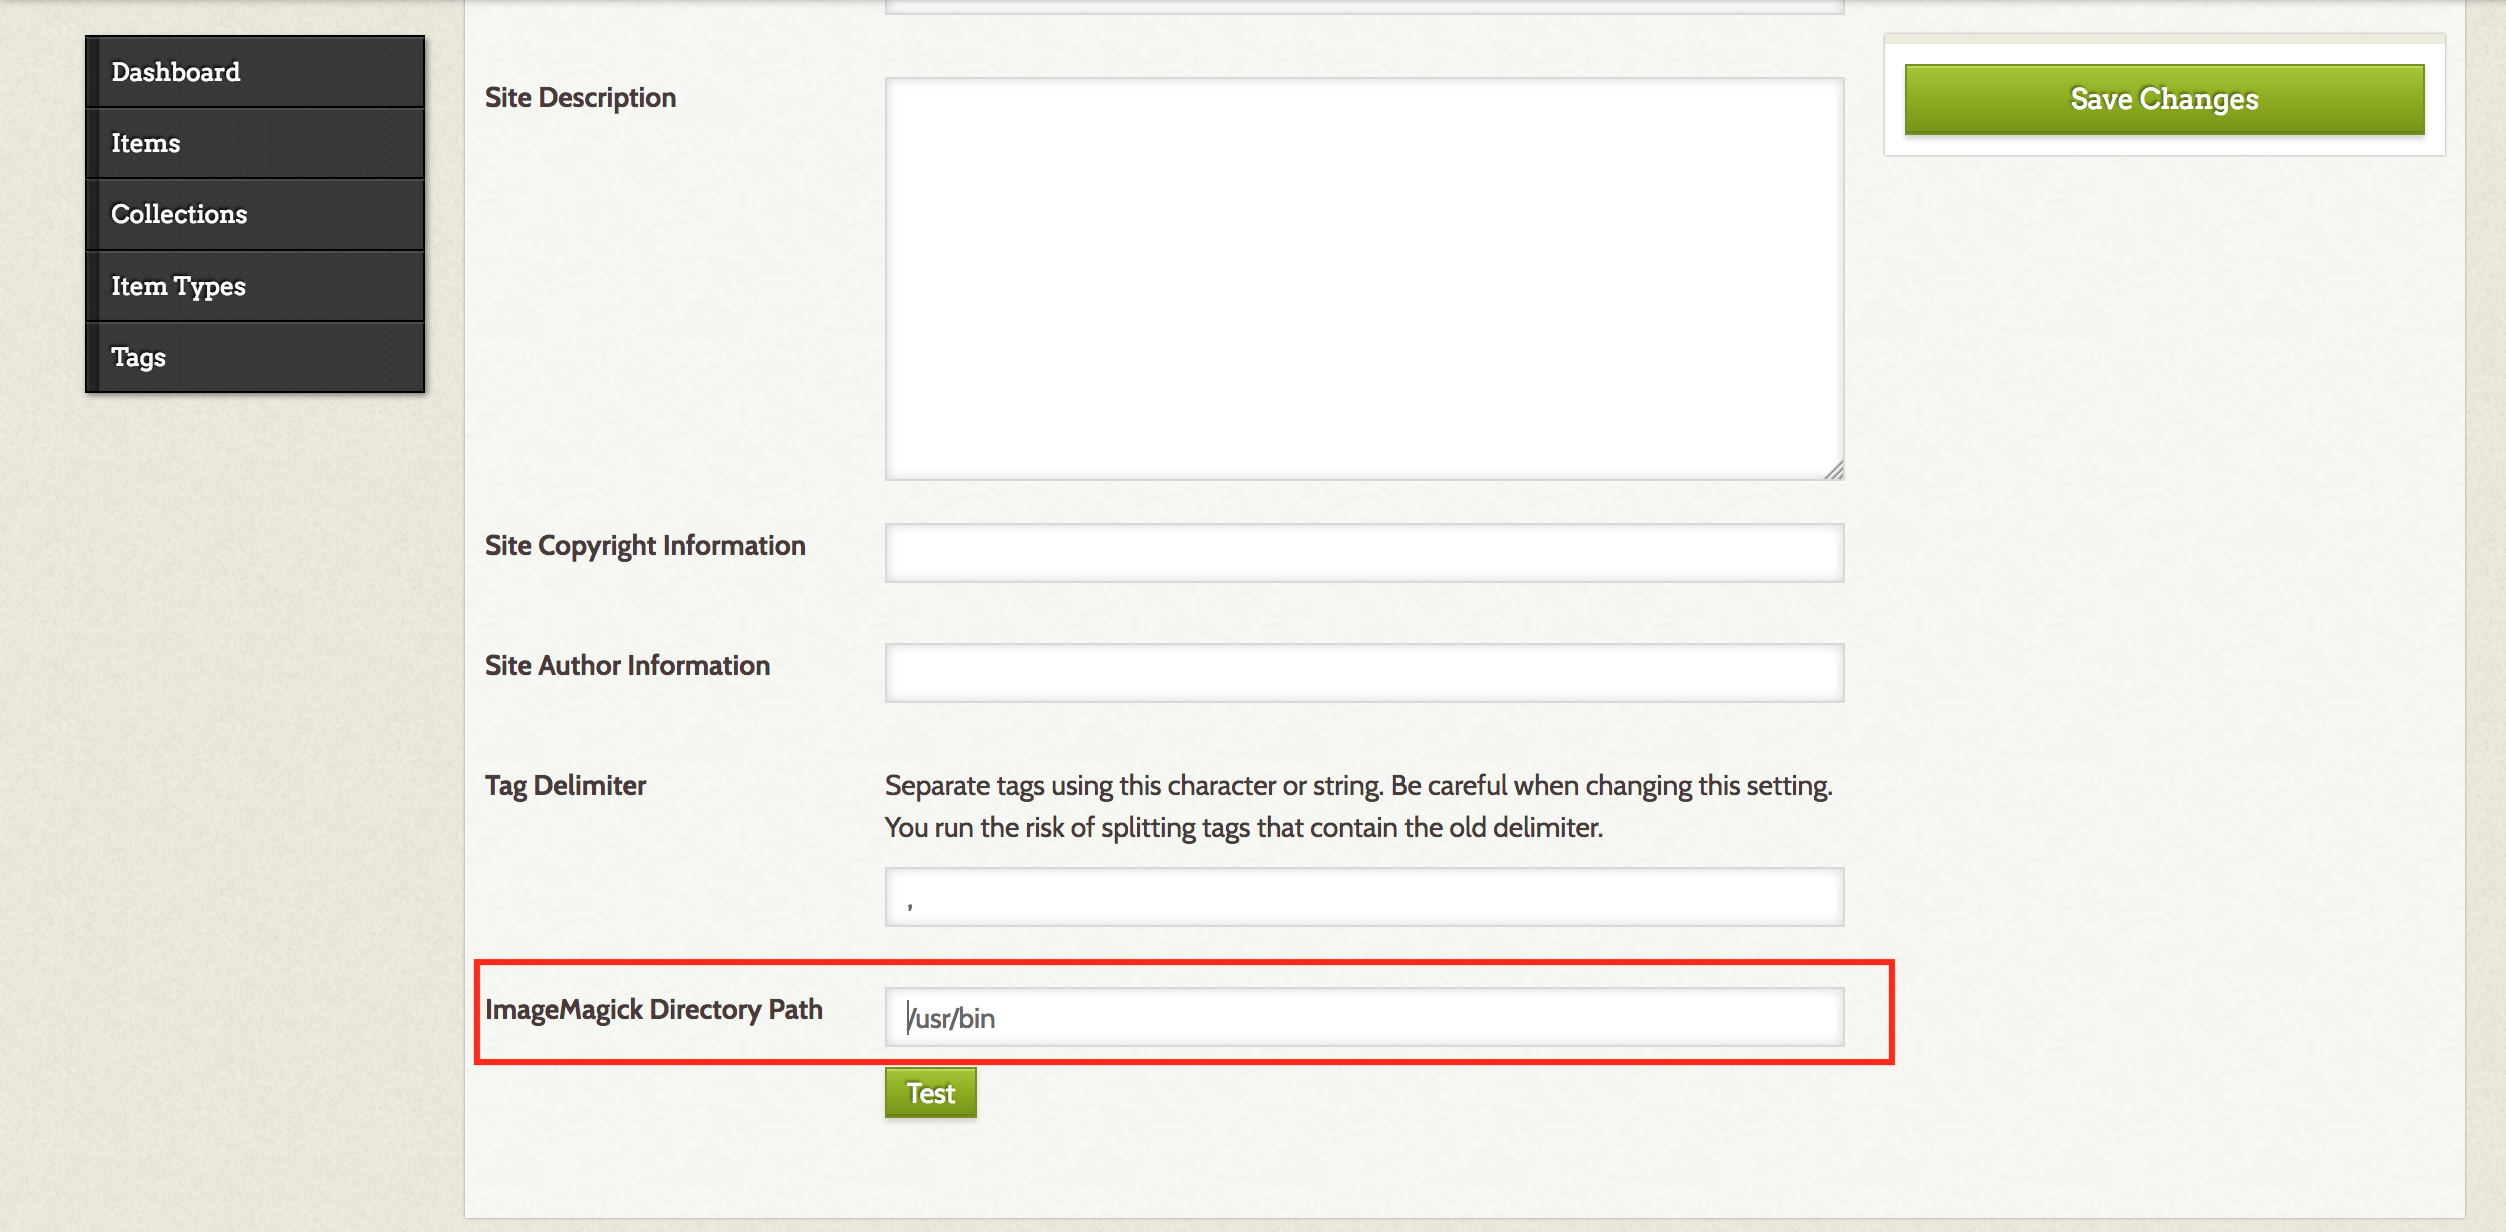
-
Click Save Changes.
Uploading content to Omeka
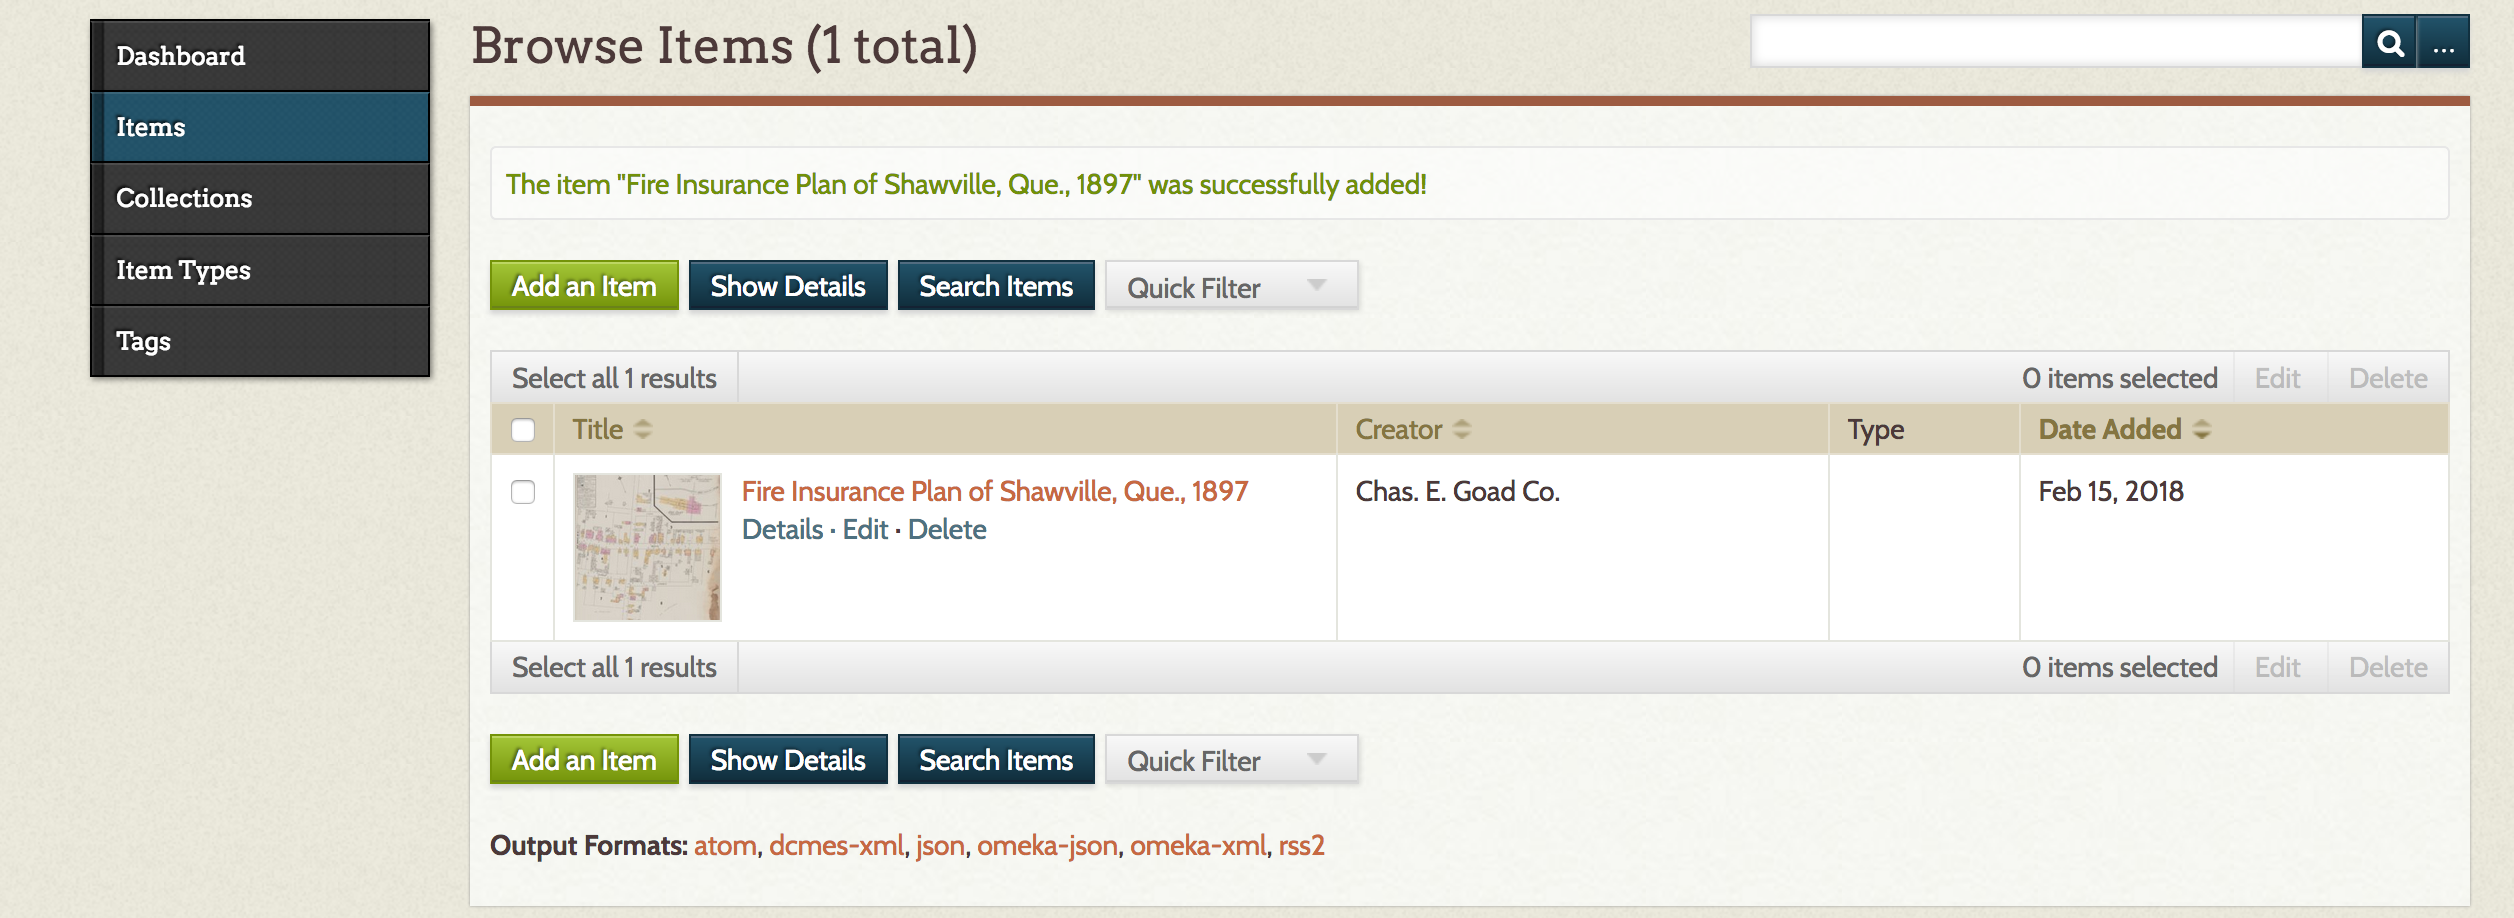
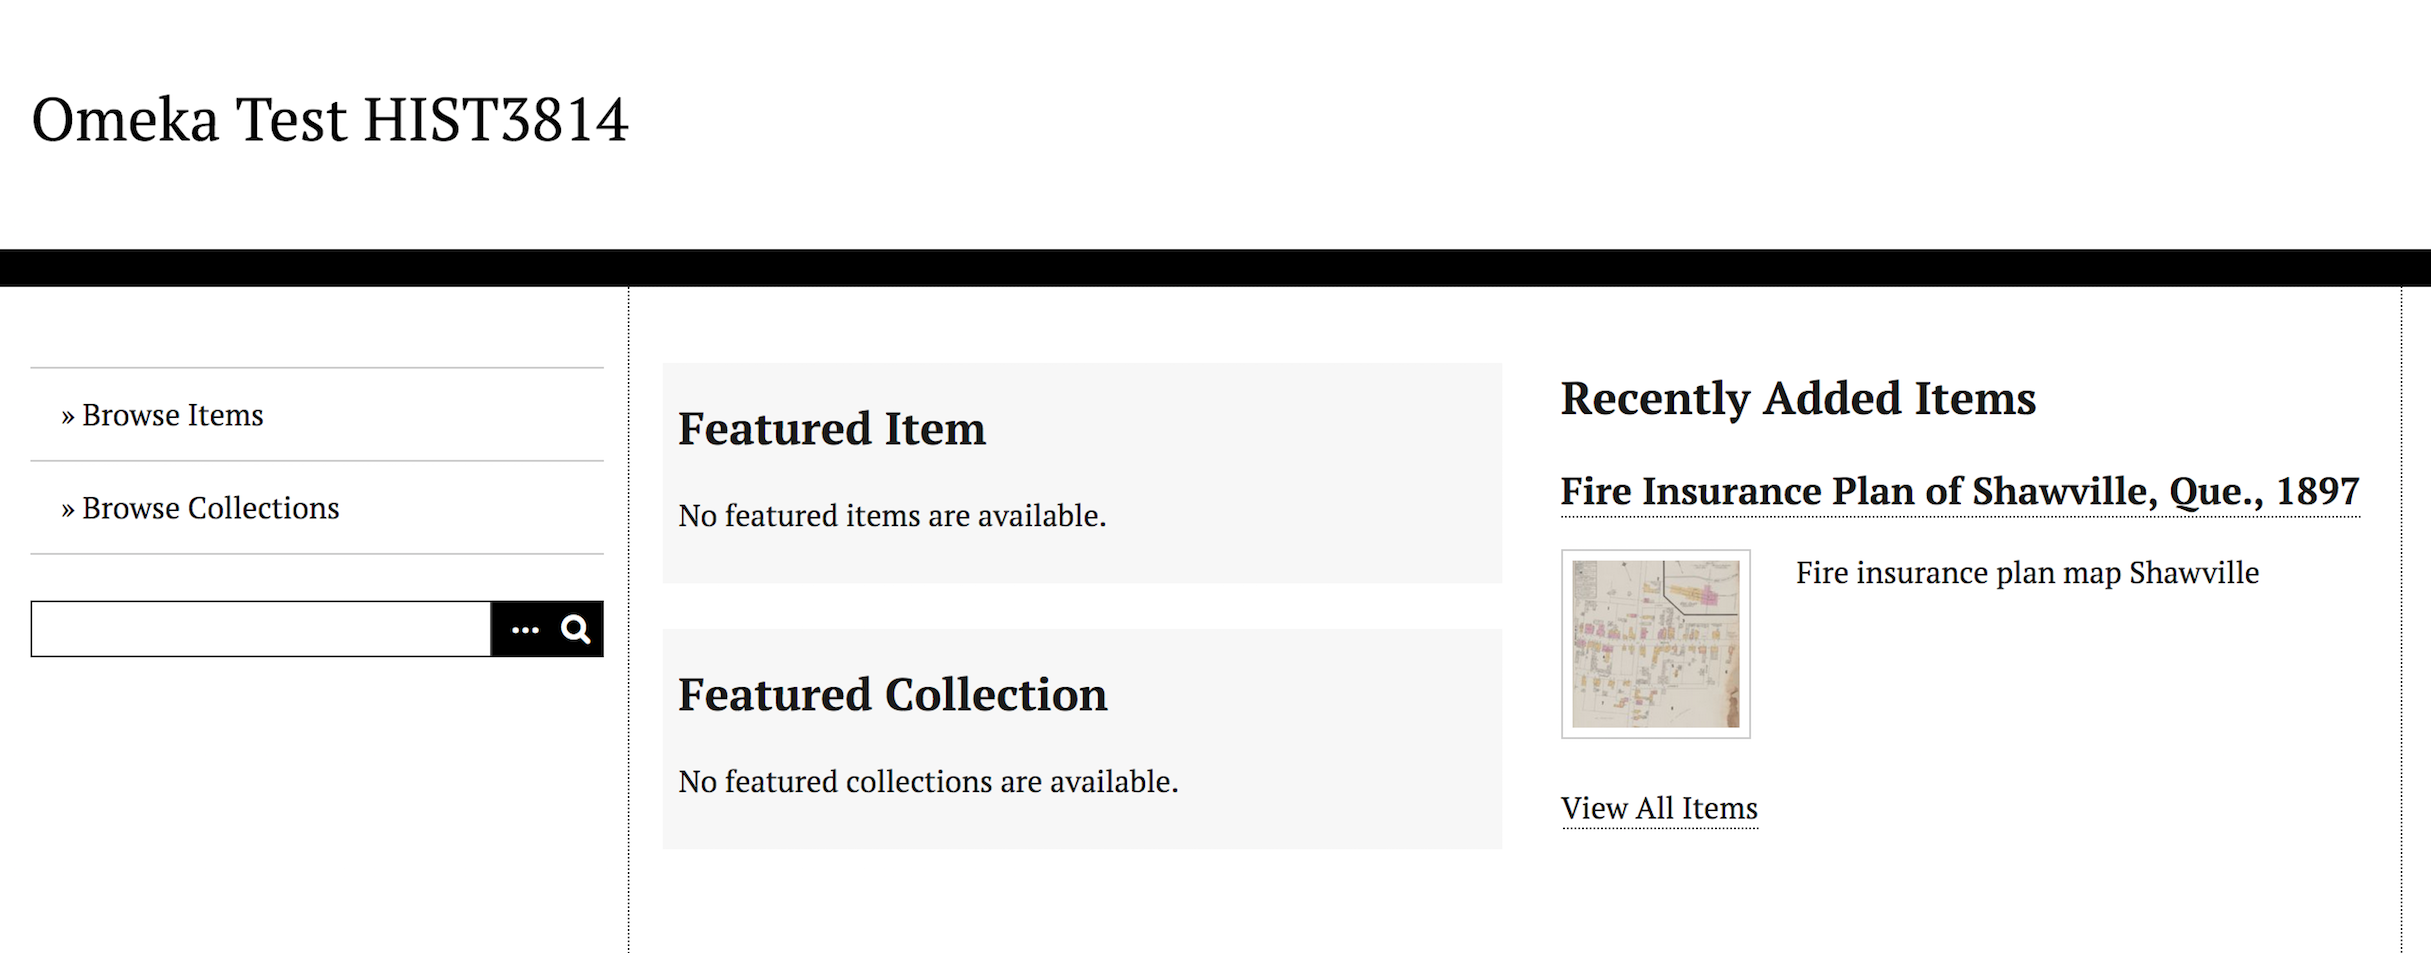
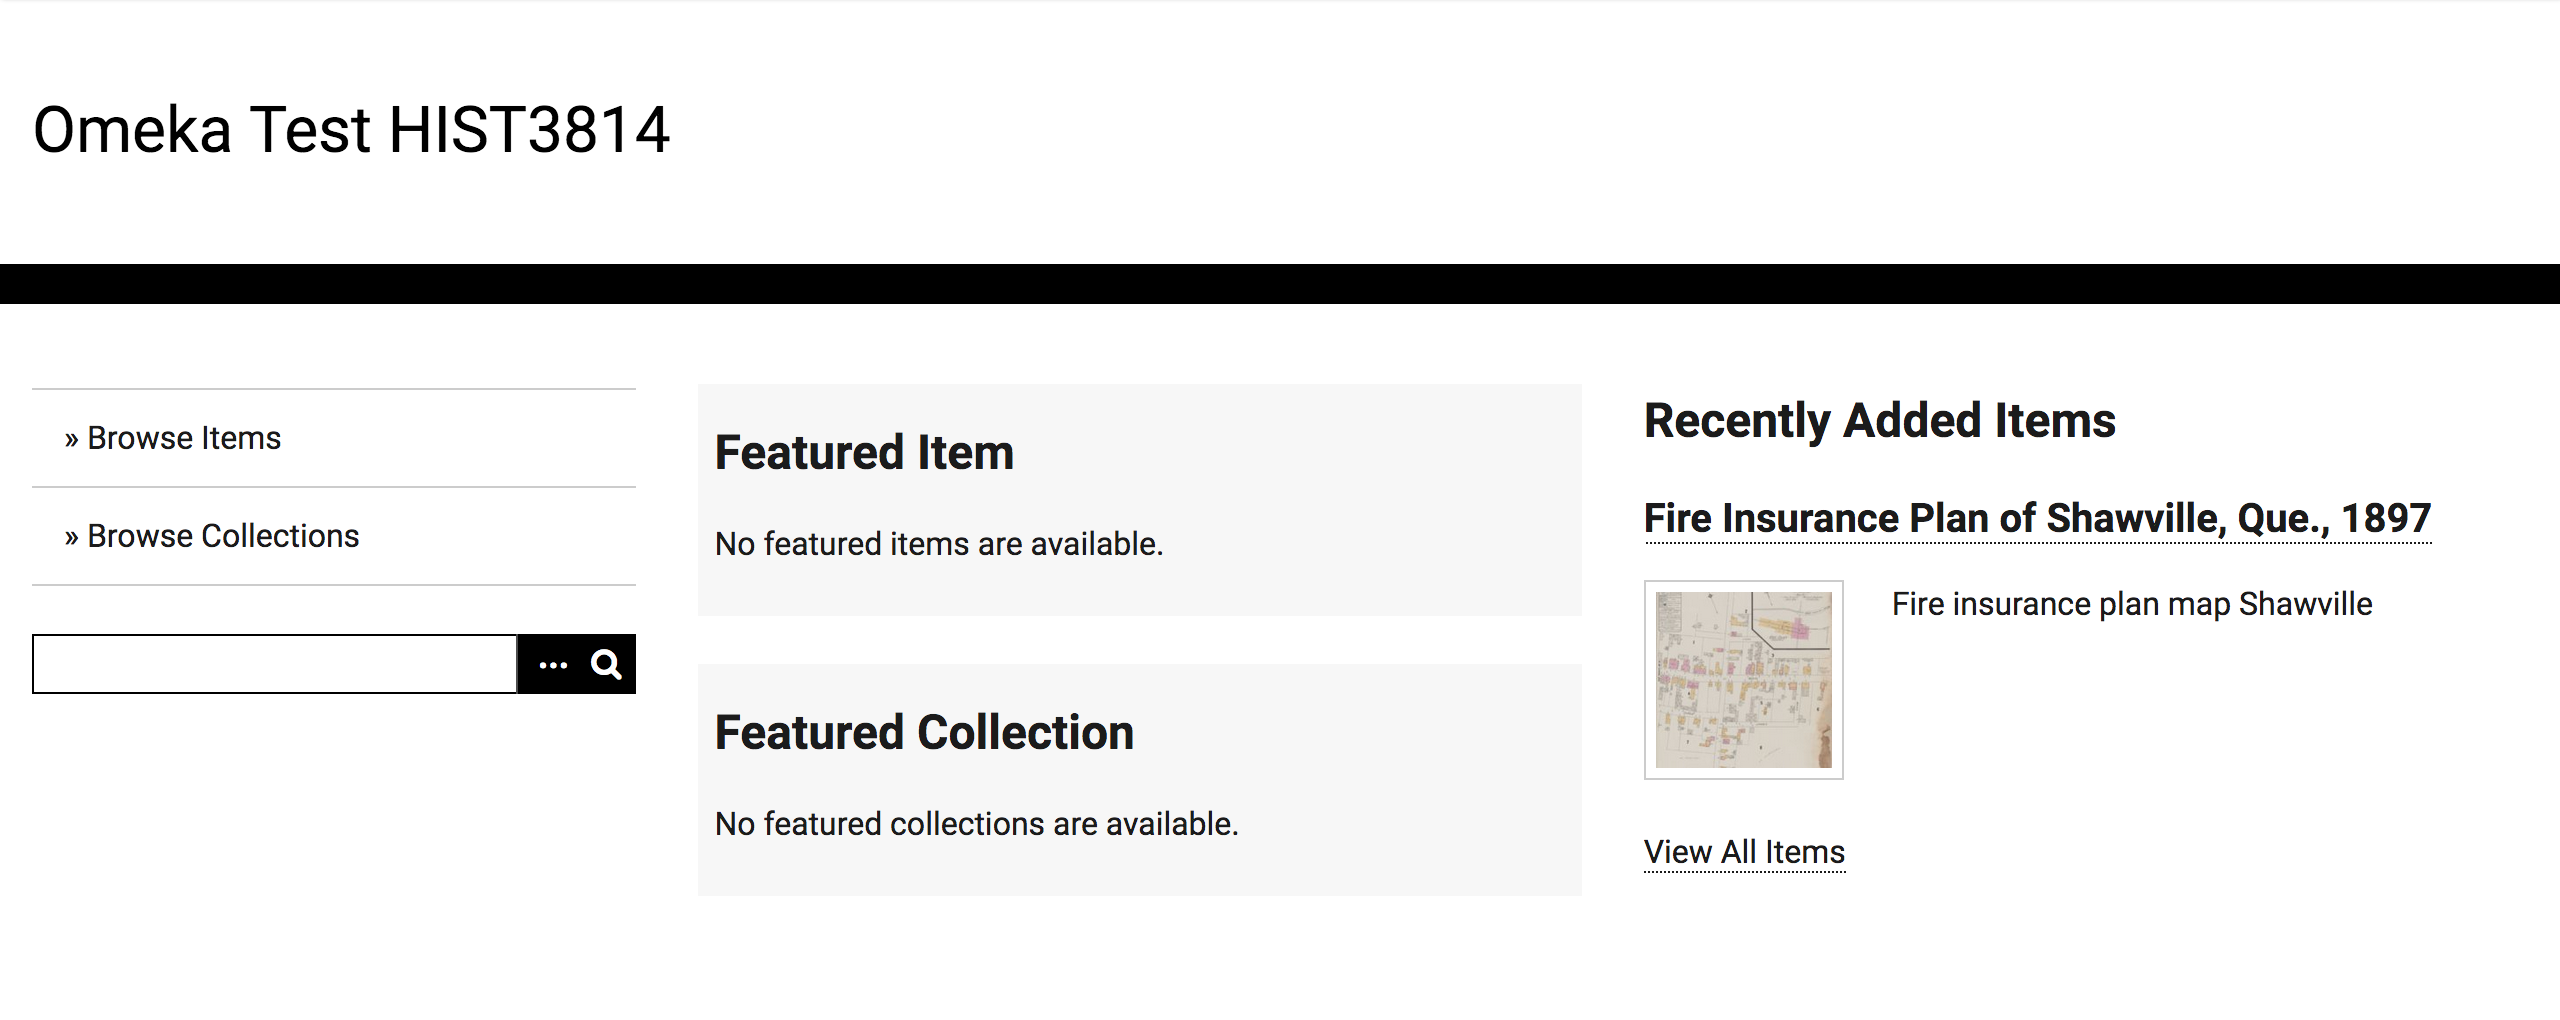
For the purposes of this option, we will use the Gatineau Valley Historical Society fire insurance maps used in Module 4, Exercise 8. You are also allowed to use any historical sources to create an exhibit. Maybe you want to choose historical newspapers that have been digitized from the Library and Archives or the war diary from Module 2, Exercise 2. Just make sure to note where you got your sources and, preferably, that you can download them as images.
-
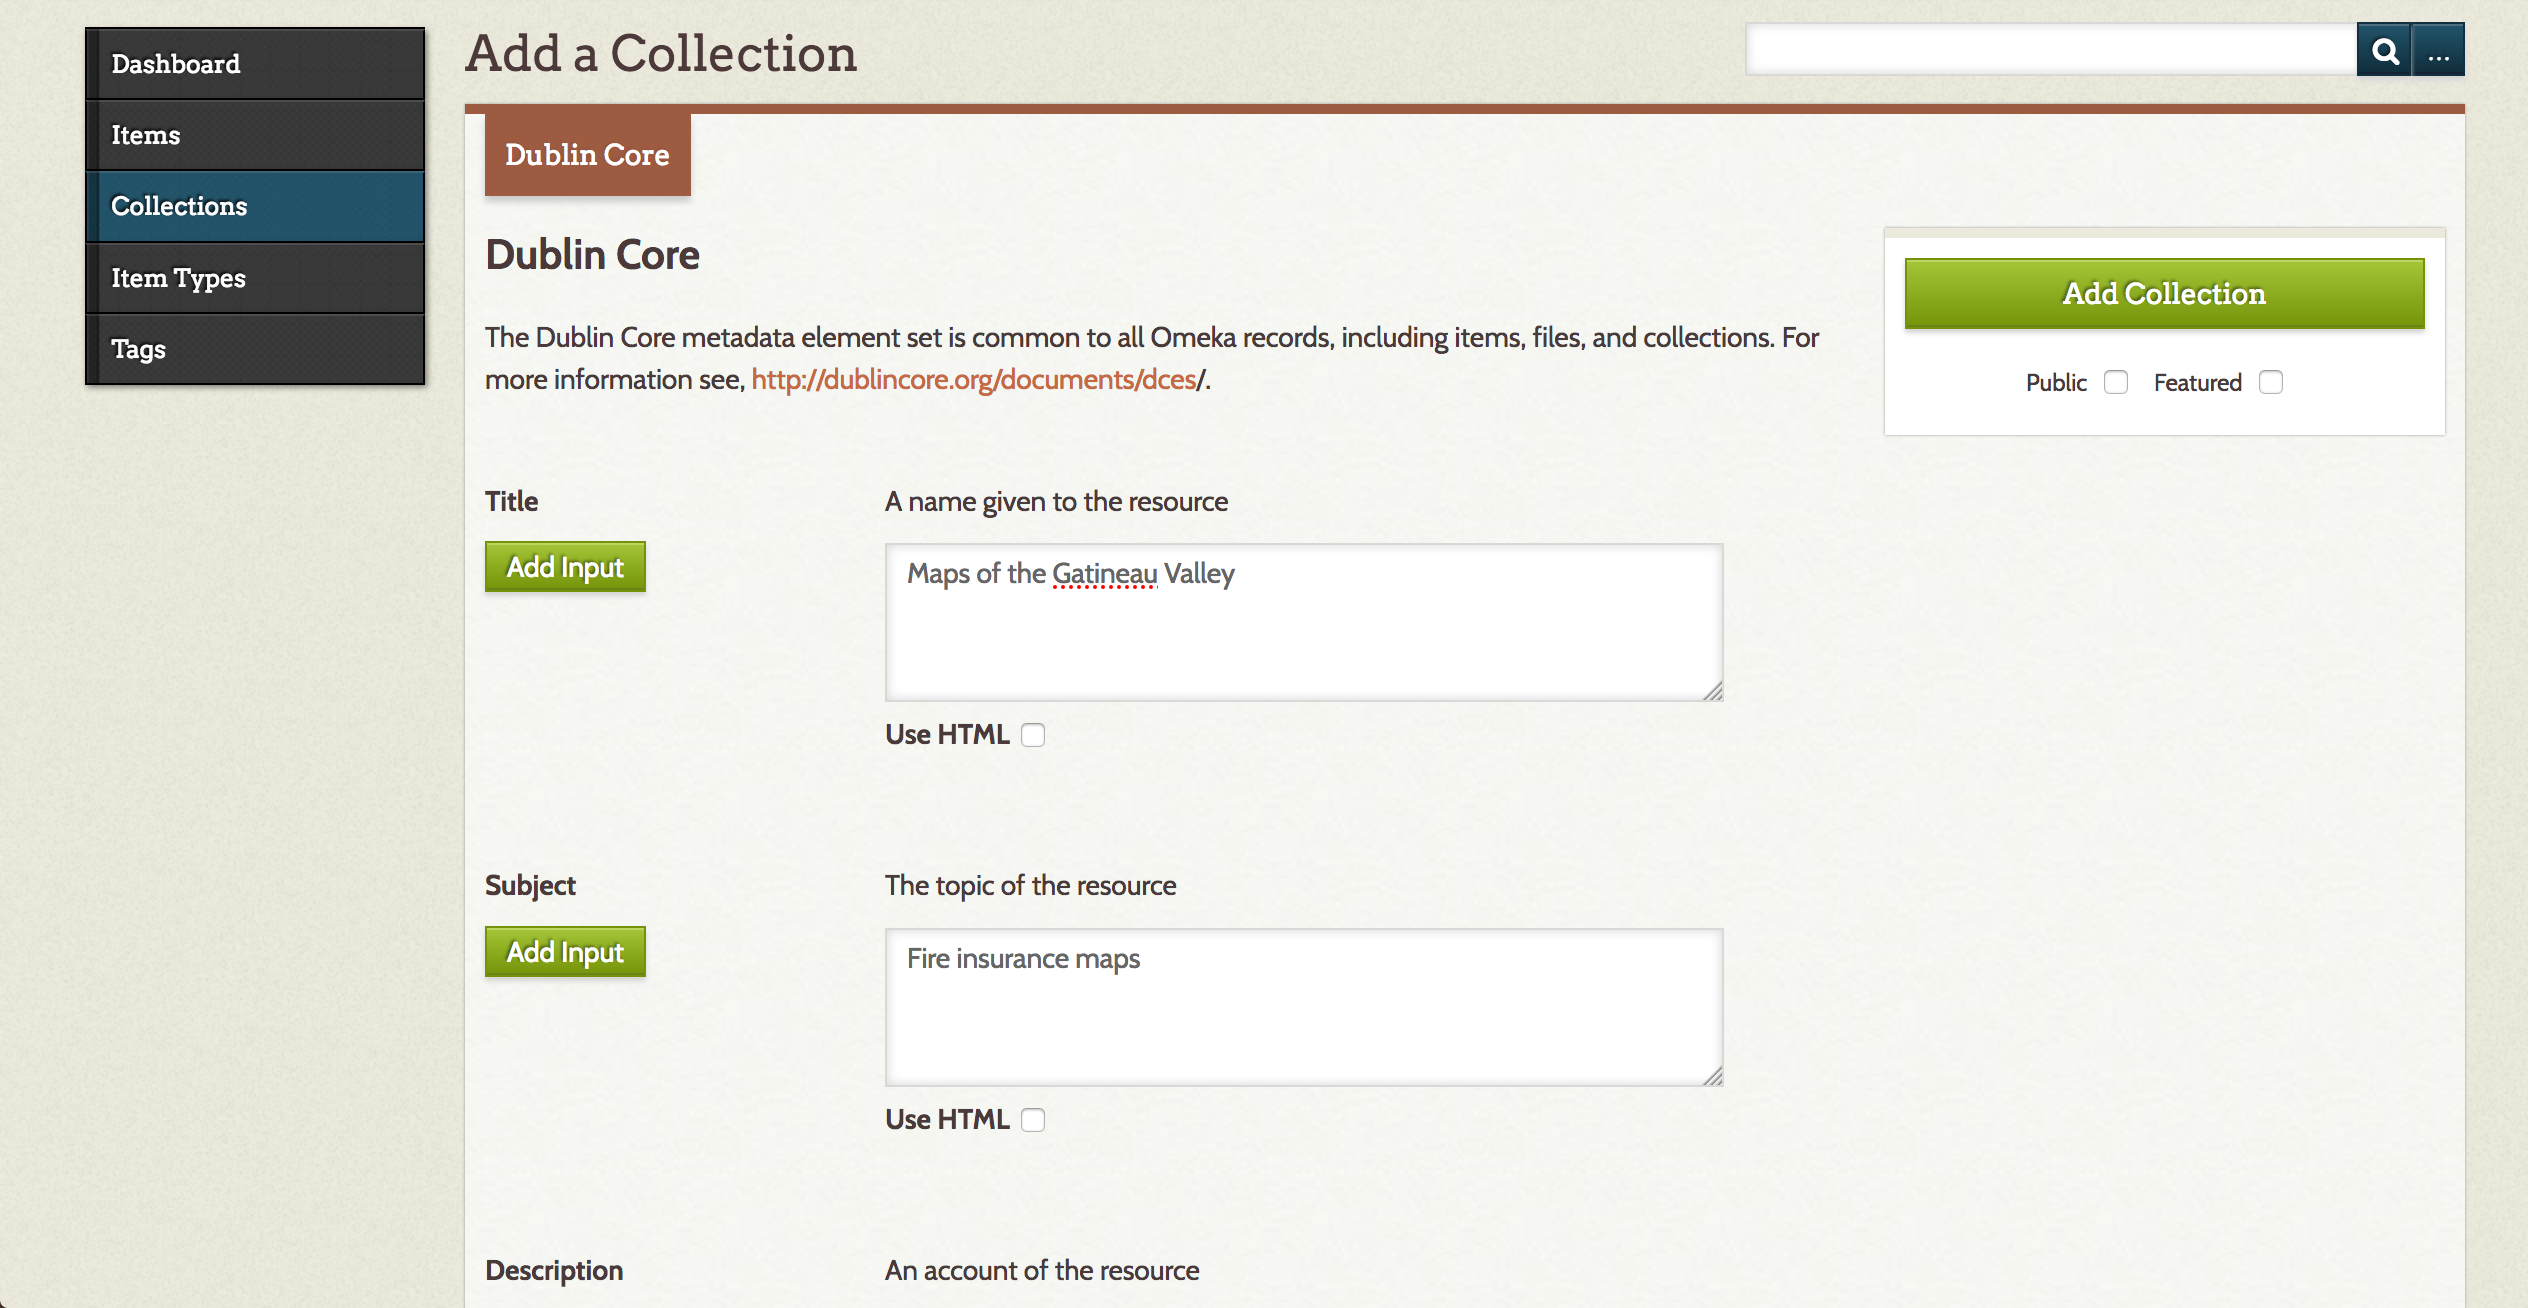
On the left side, select Collections.
-
Click Add a Collection.

-
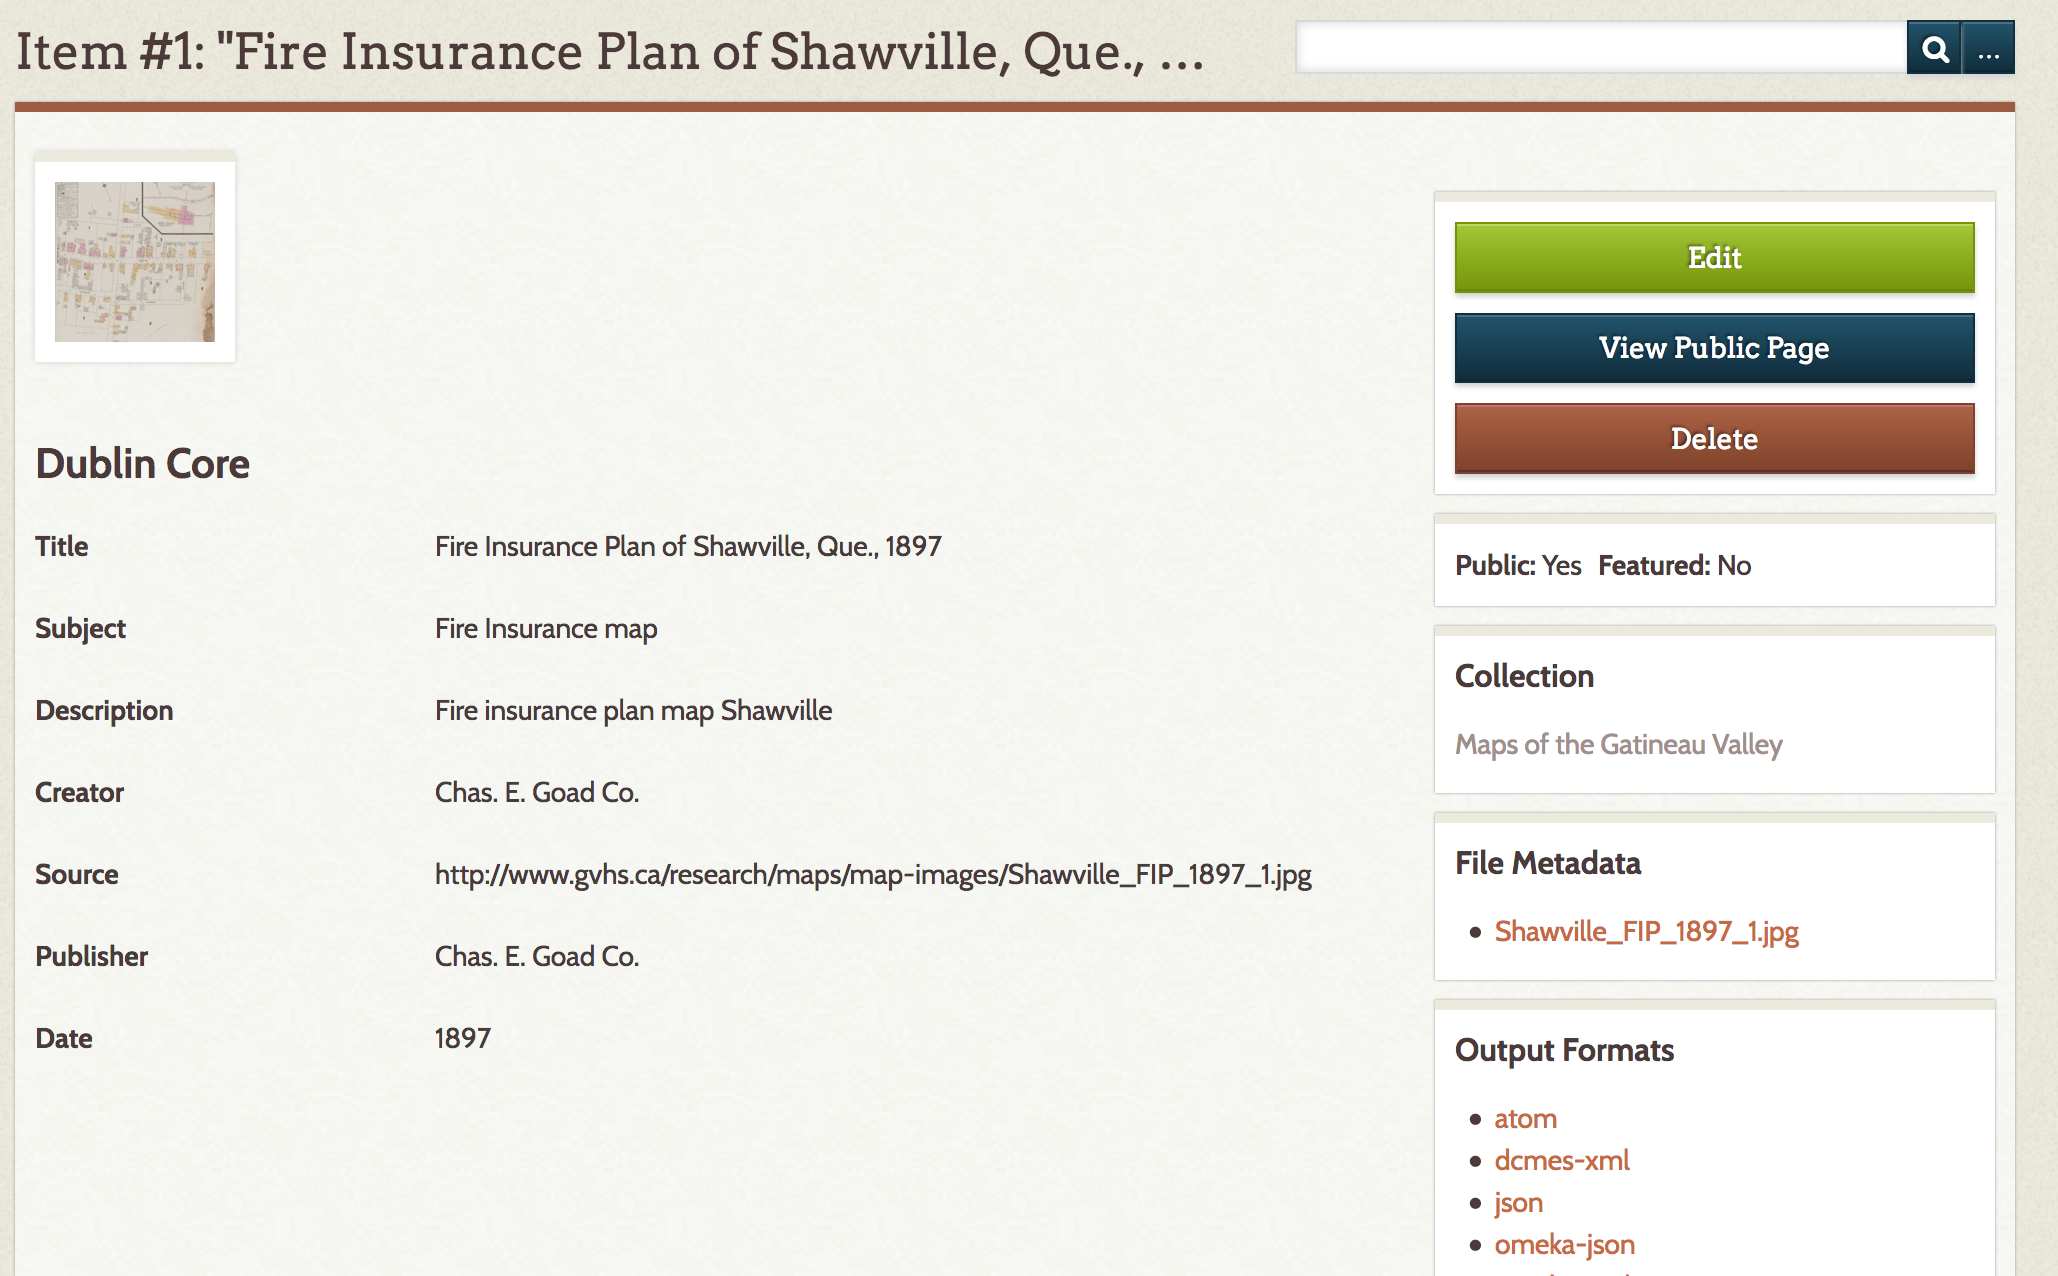
My new collection will be fire insurance maps. Under Title, add Maps of the Gatineau Valley Fire Insurance Plans.
-
Go through each metadata field and fill in as much information as you can about your collection.
-
Under Add Collection, click Public to make your collection publicly viewable. Click Add Collection.
-
On the left side, select Items.
-
Click Add an item.

-
Navigate to the Gatineau Valley Historical Society Fire insurance maps or your own source of historical files.
-
Using the information provided with first map, fill in as much information as you can about your item.
-
Click on the map image.
-
Right click and save the image somewhere handy like your desktop.
-
Select the Files tab.

-
Click Browse and choose your image file (note you cannot upload a single image larger than 128MB).
-
On the right side under Collection, select your Collection and make sure it is set to Public.
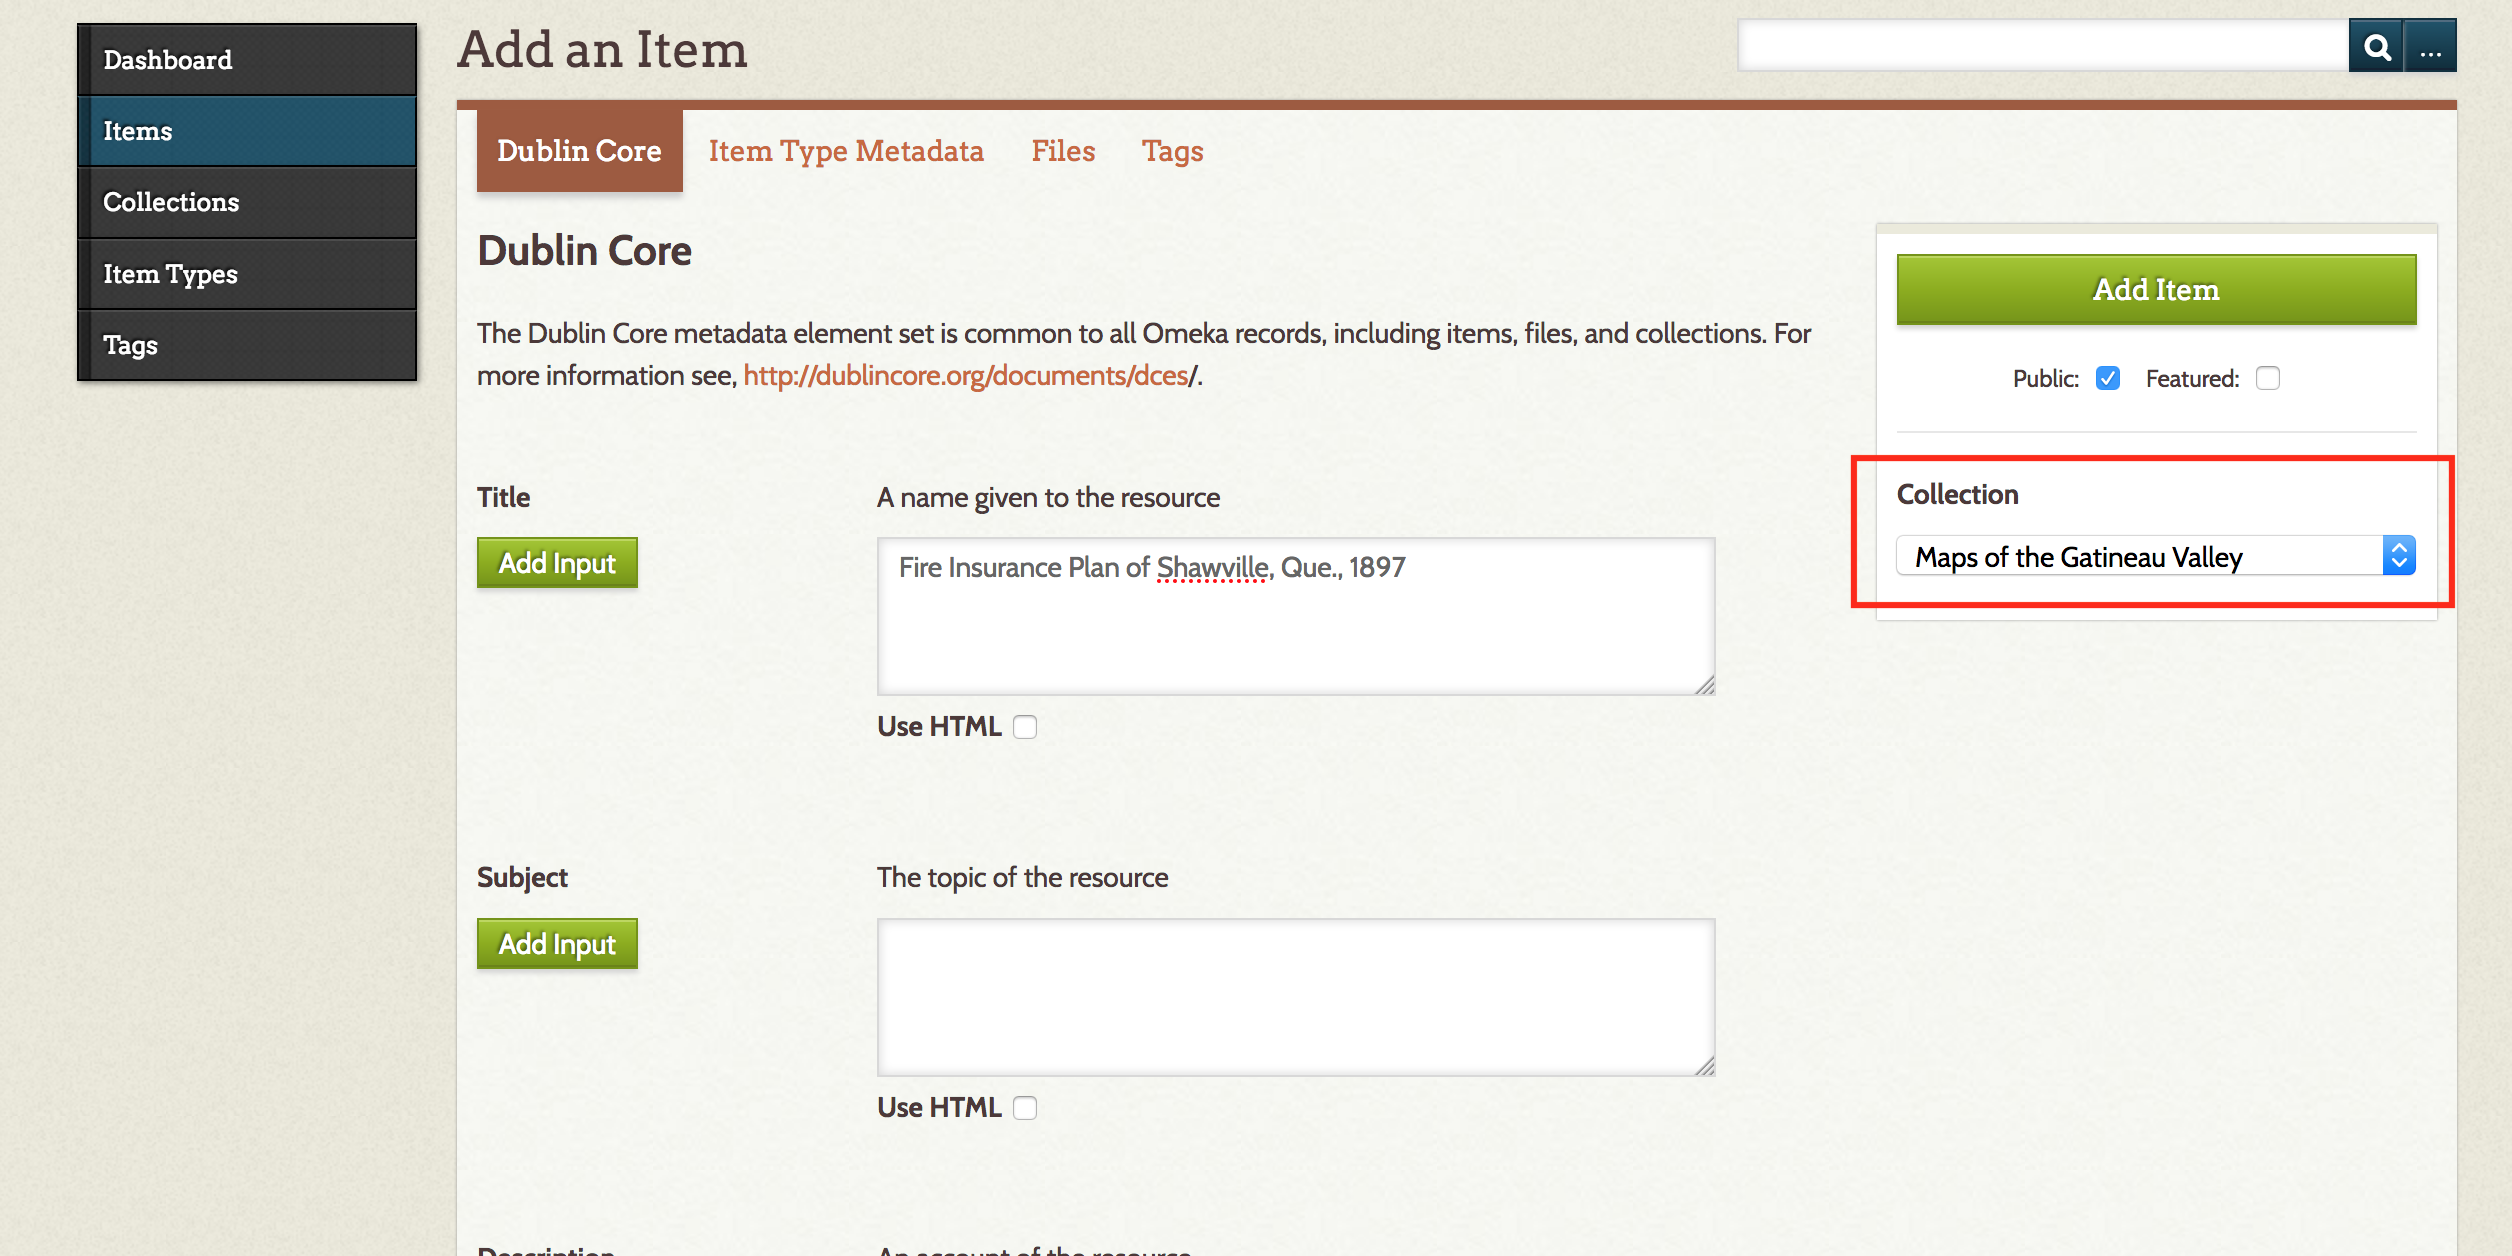
-
Click Add Item. It may take a few minutes to upload.
-
On the right side, click the middle, blue View Public Page button.
-
Go ahead and upload several exhibit items. If you can find other items related to your collection elsewhere, that'd be great too.
-
Go to your variant of the
omeka.mysite.comsubdomain to view how the page looks to the public.
Styling our exhibit (and making it more accessible!)
-
At the top of the admin page, click Appearance. The default theme is 'Thanks, Roy'. You can choose any theme you want. They are all different and each has different advantages and disadvantages for editing.
-
For this option, we will use the 'Thanks, Roy' theme.
NB If you choose a different theme to modify, you may see different options. Proceed at your own intent.
-
Click the blue Configure Theme button. Each theme configuration allows you to change basic style and content settings.

-
With the configuration page open in one tab, open your
omeka.mysite.comto view the public page. Whenever you make an update, simply refresh the public page to view it. -
Notice the Browse Items and Browse Collections links on the left of your public page are a bit light and hard to read. In the configuration, copy the text colour hex code
#444444. -
Navigate to the Color Hex website and search
#444444. Hex codes are an internet convention where a series of numbers or numbers and letters correspond with a unique colour. -
Scroll down to Shades of
#444444. I think#1b1b1blooks dark enough for a solid contrast. -
Navigate back to the Omeka configuration page and replace the Text and Links fields hex codes of
#444444with#1b1b1b.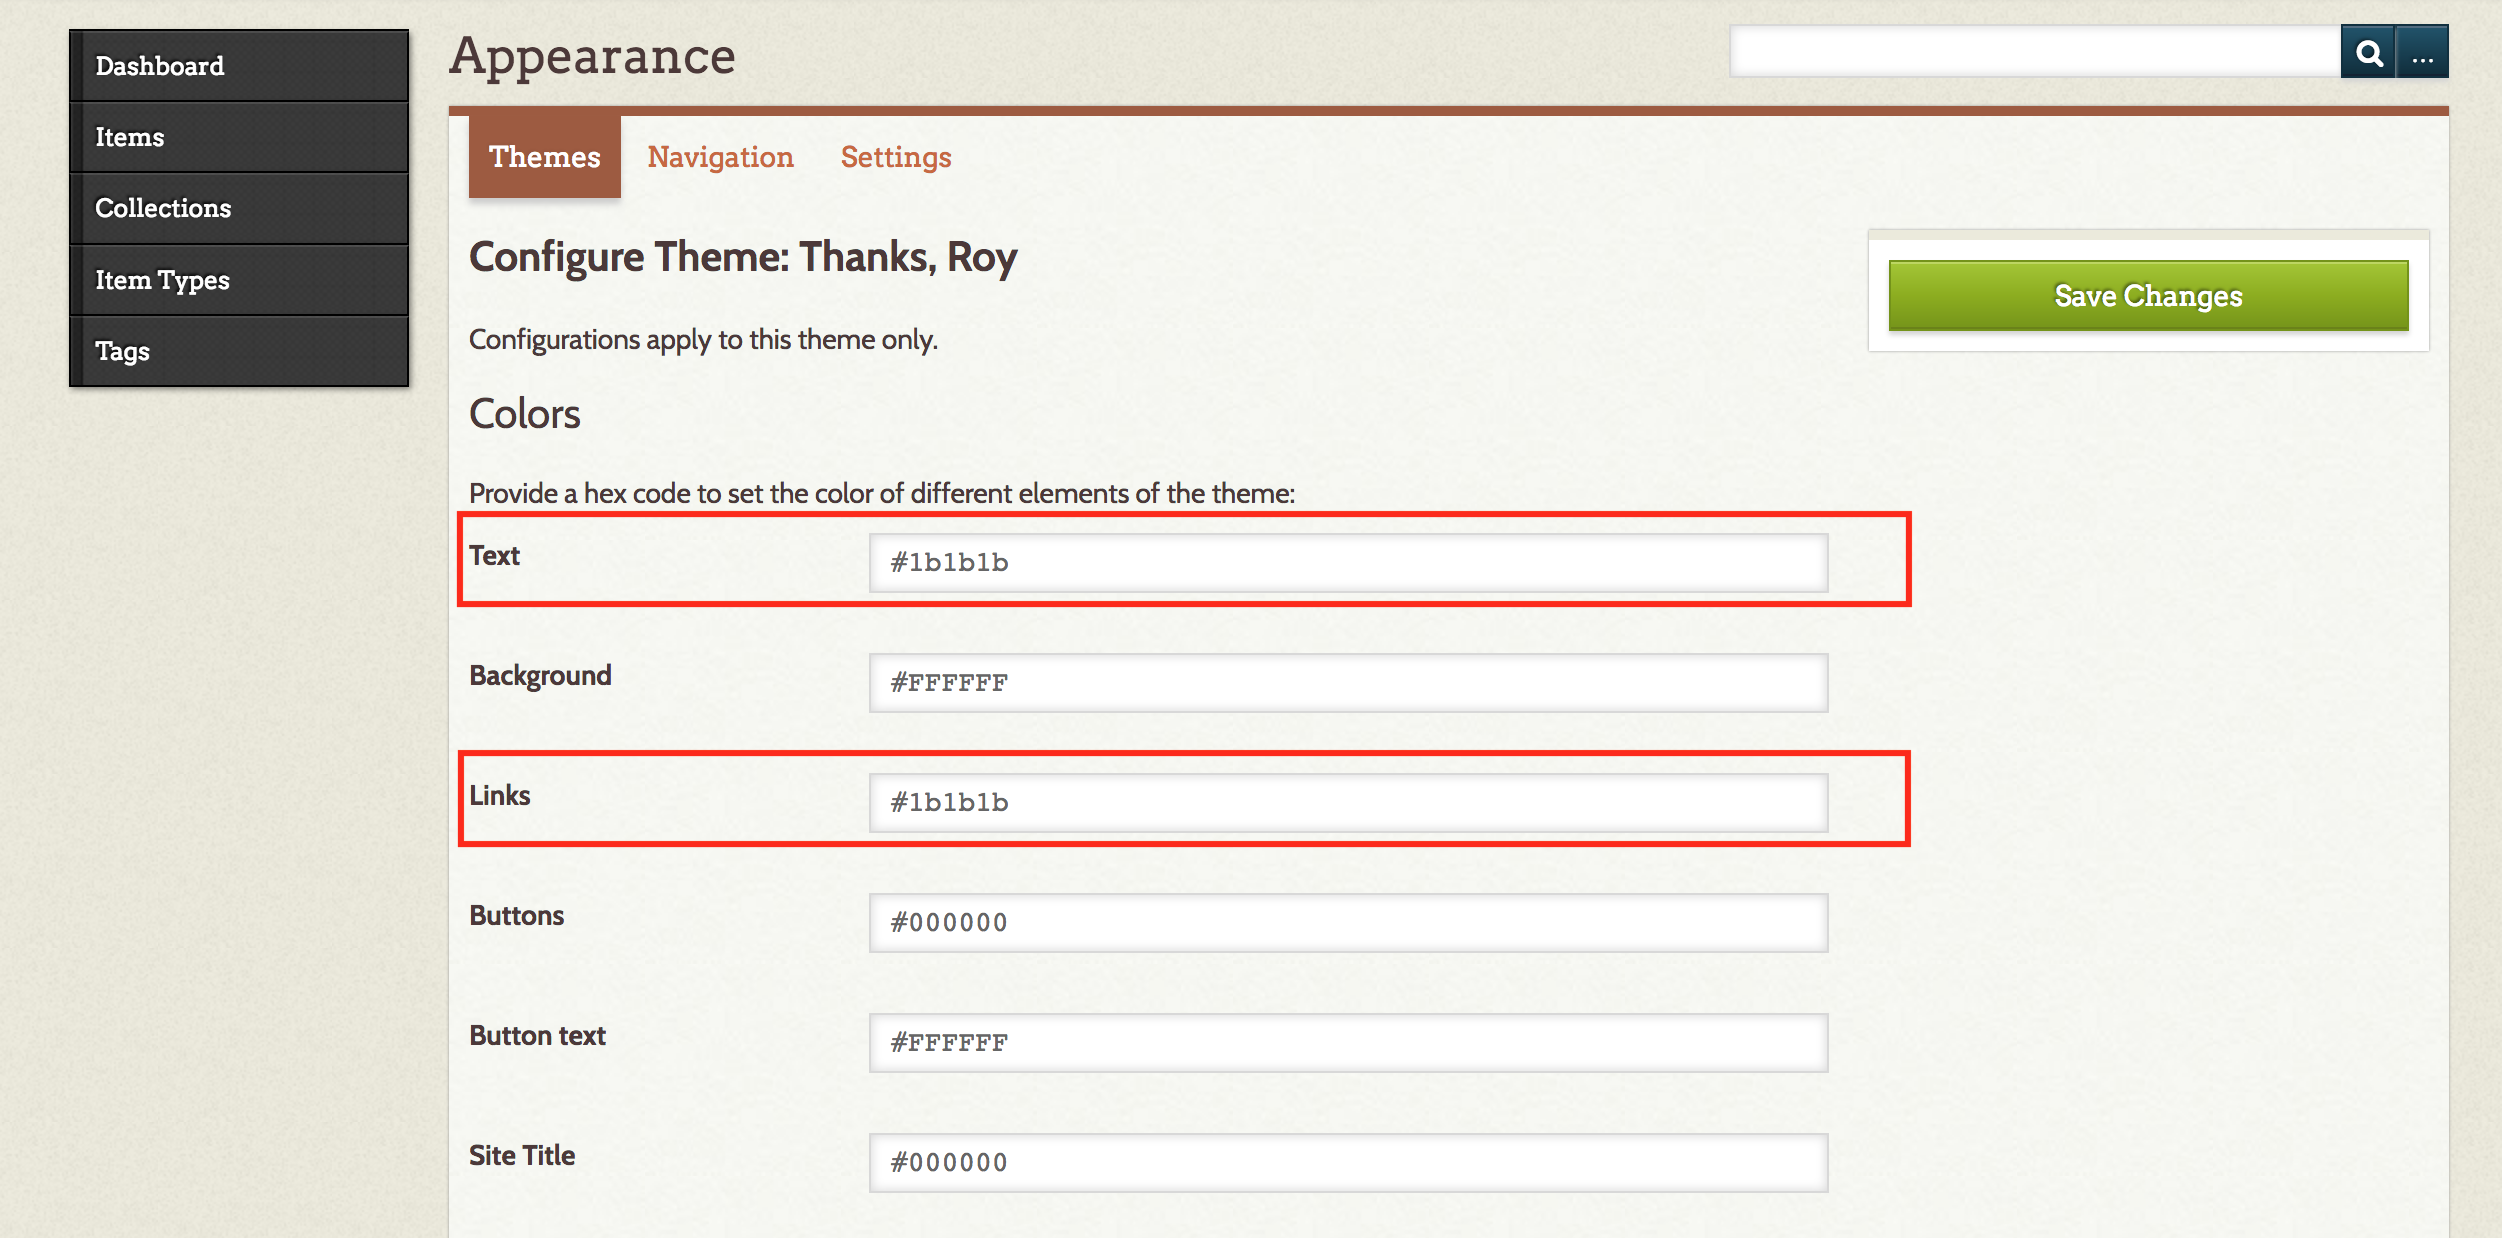
-
On the right side, click Save Changes.
-
Refresh the public page and notice the text darkens. This will help make your website more readable.
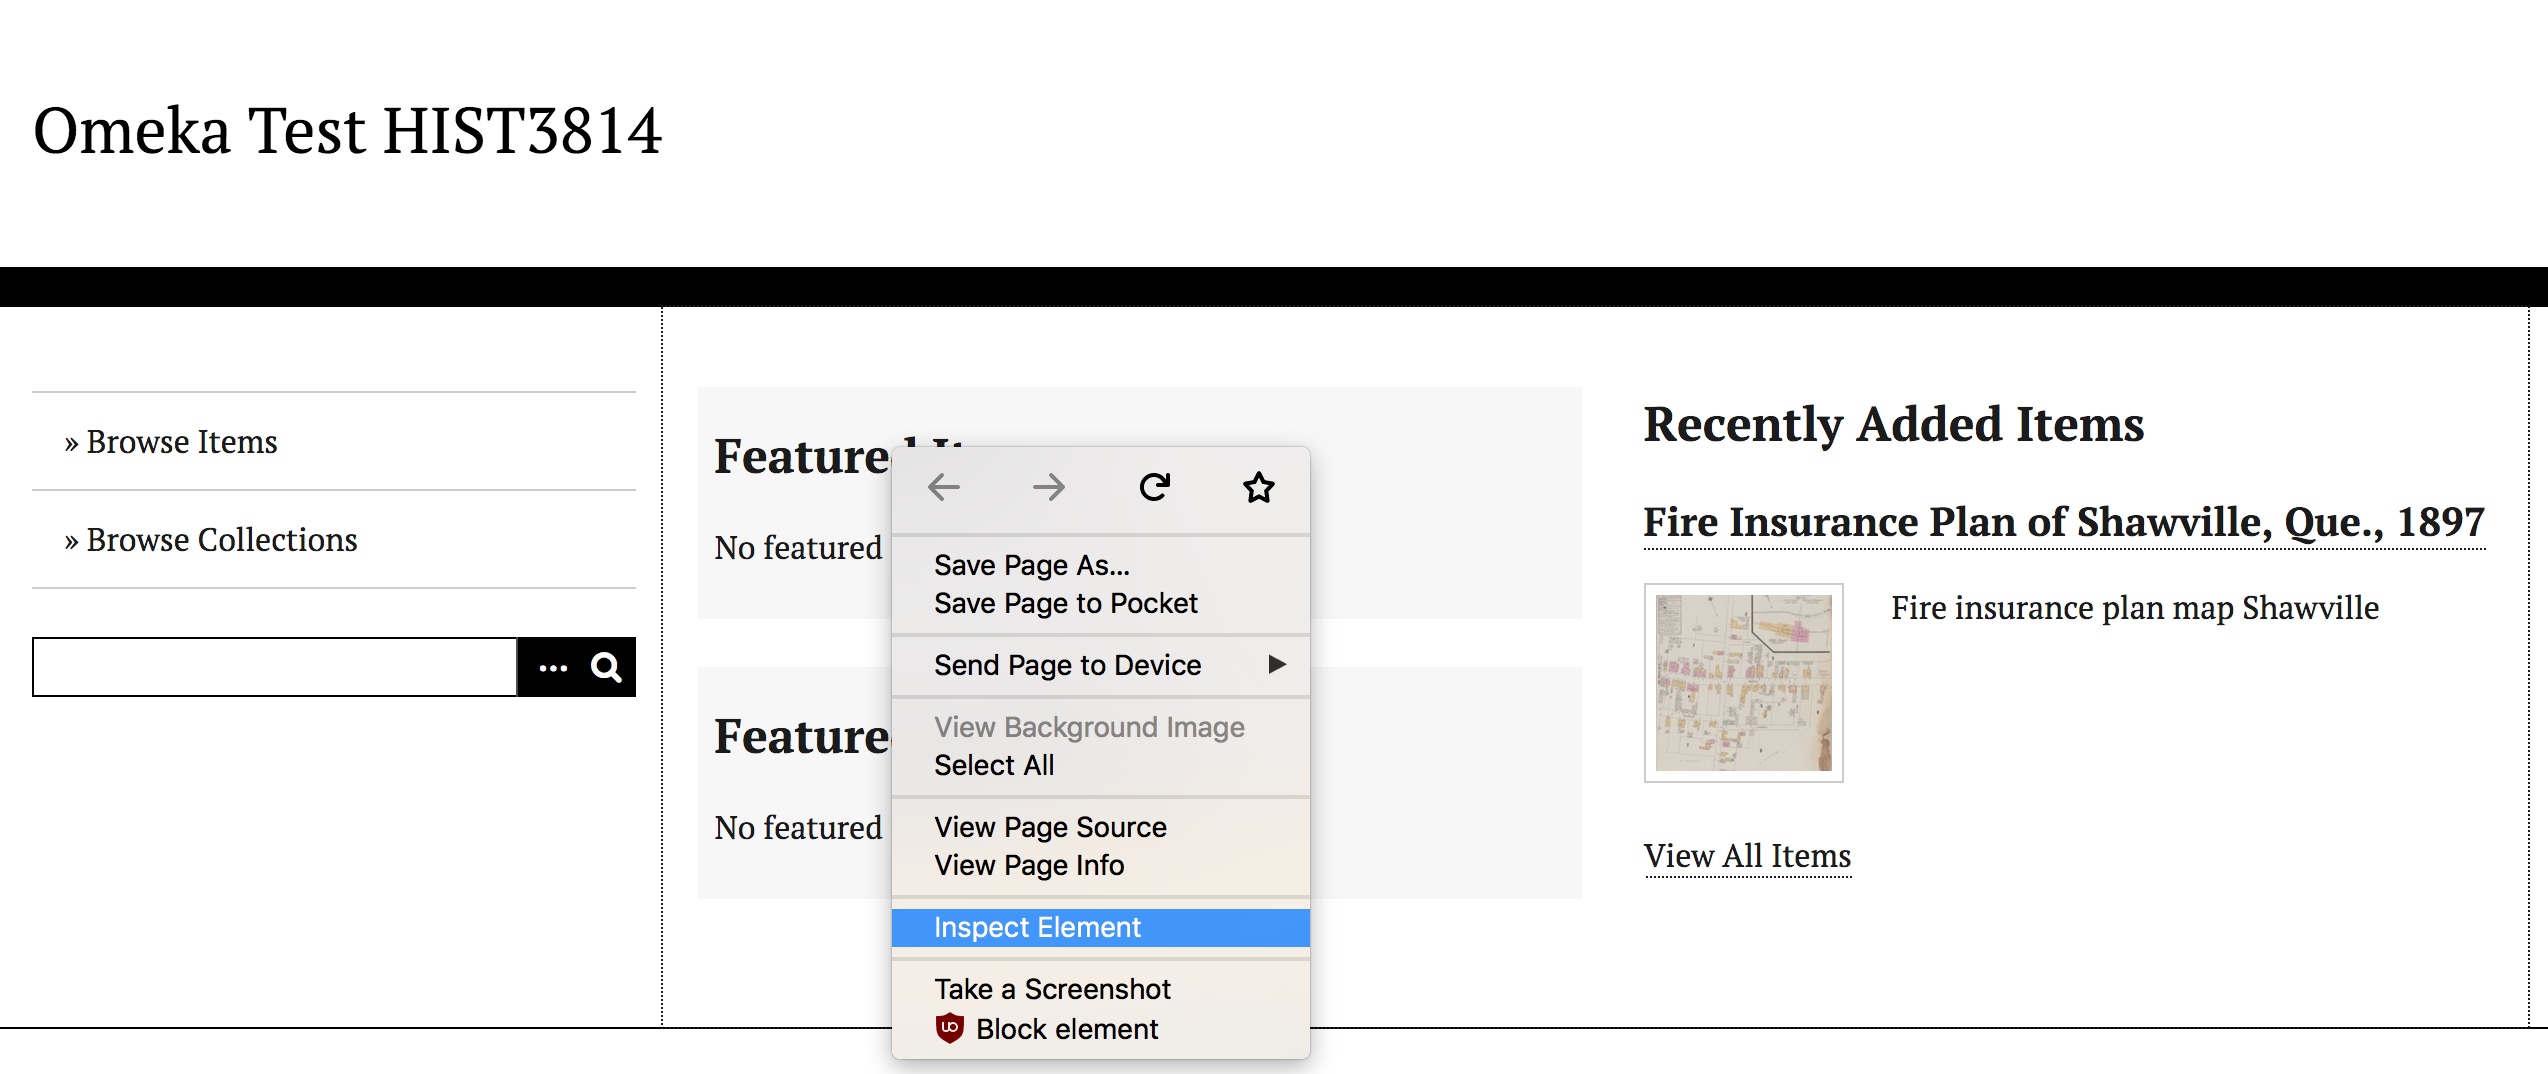
Using the browser inspector to make design easier
-
Navigate to your public Omeka page.
-
Right click on the "Featured Item" text.
-
Select Inspect Element. The browser inspection tool allows you to view the code behind a website.
NB Chrome and Firefox have great inspector tools. Not all browsers have these tools, however, notably Safari.
-
The font is not that easy to read either. We will change it, but first let's find the current font. Scroll down on the right side under the Rules tab until you see the body CSS. This rule shows the font is called PT serif, written like the following:
body {
    font-family: "PT Serif", Times, serif;
}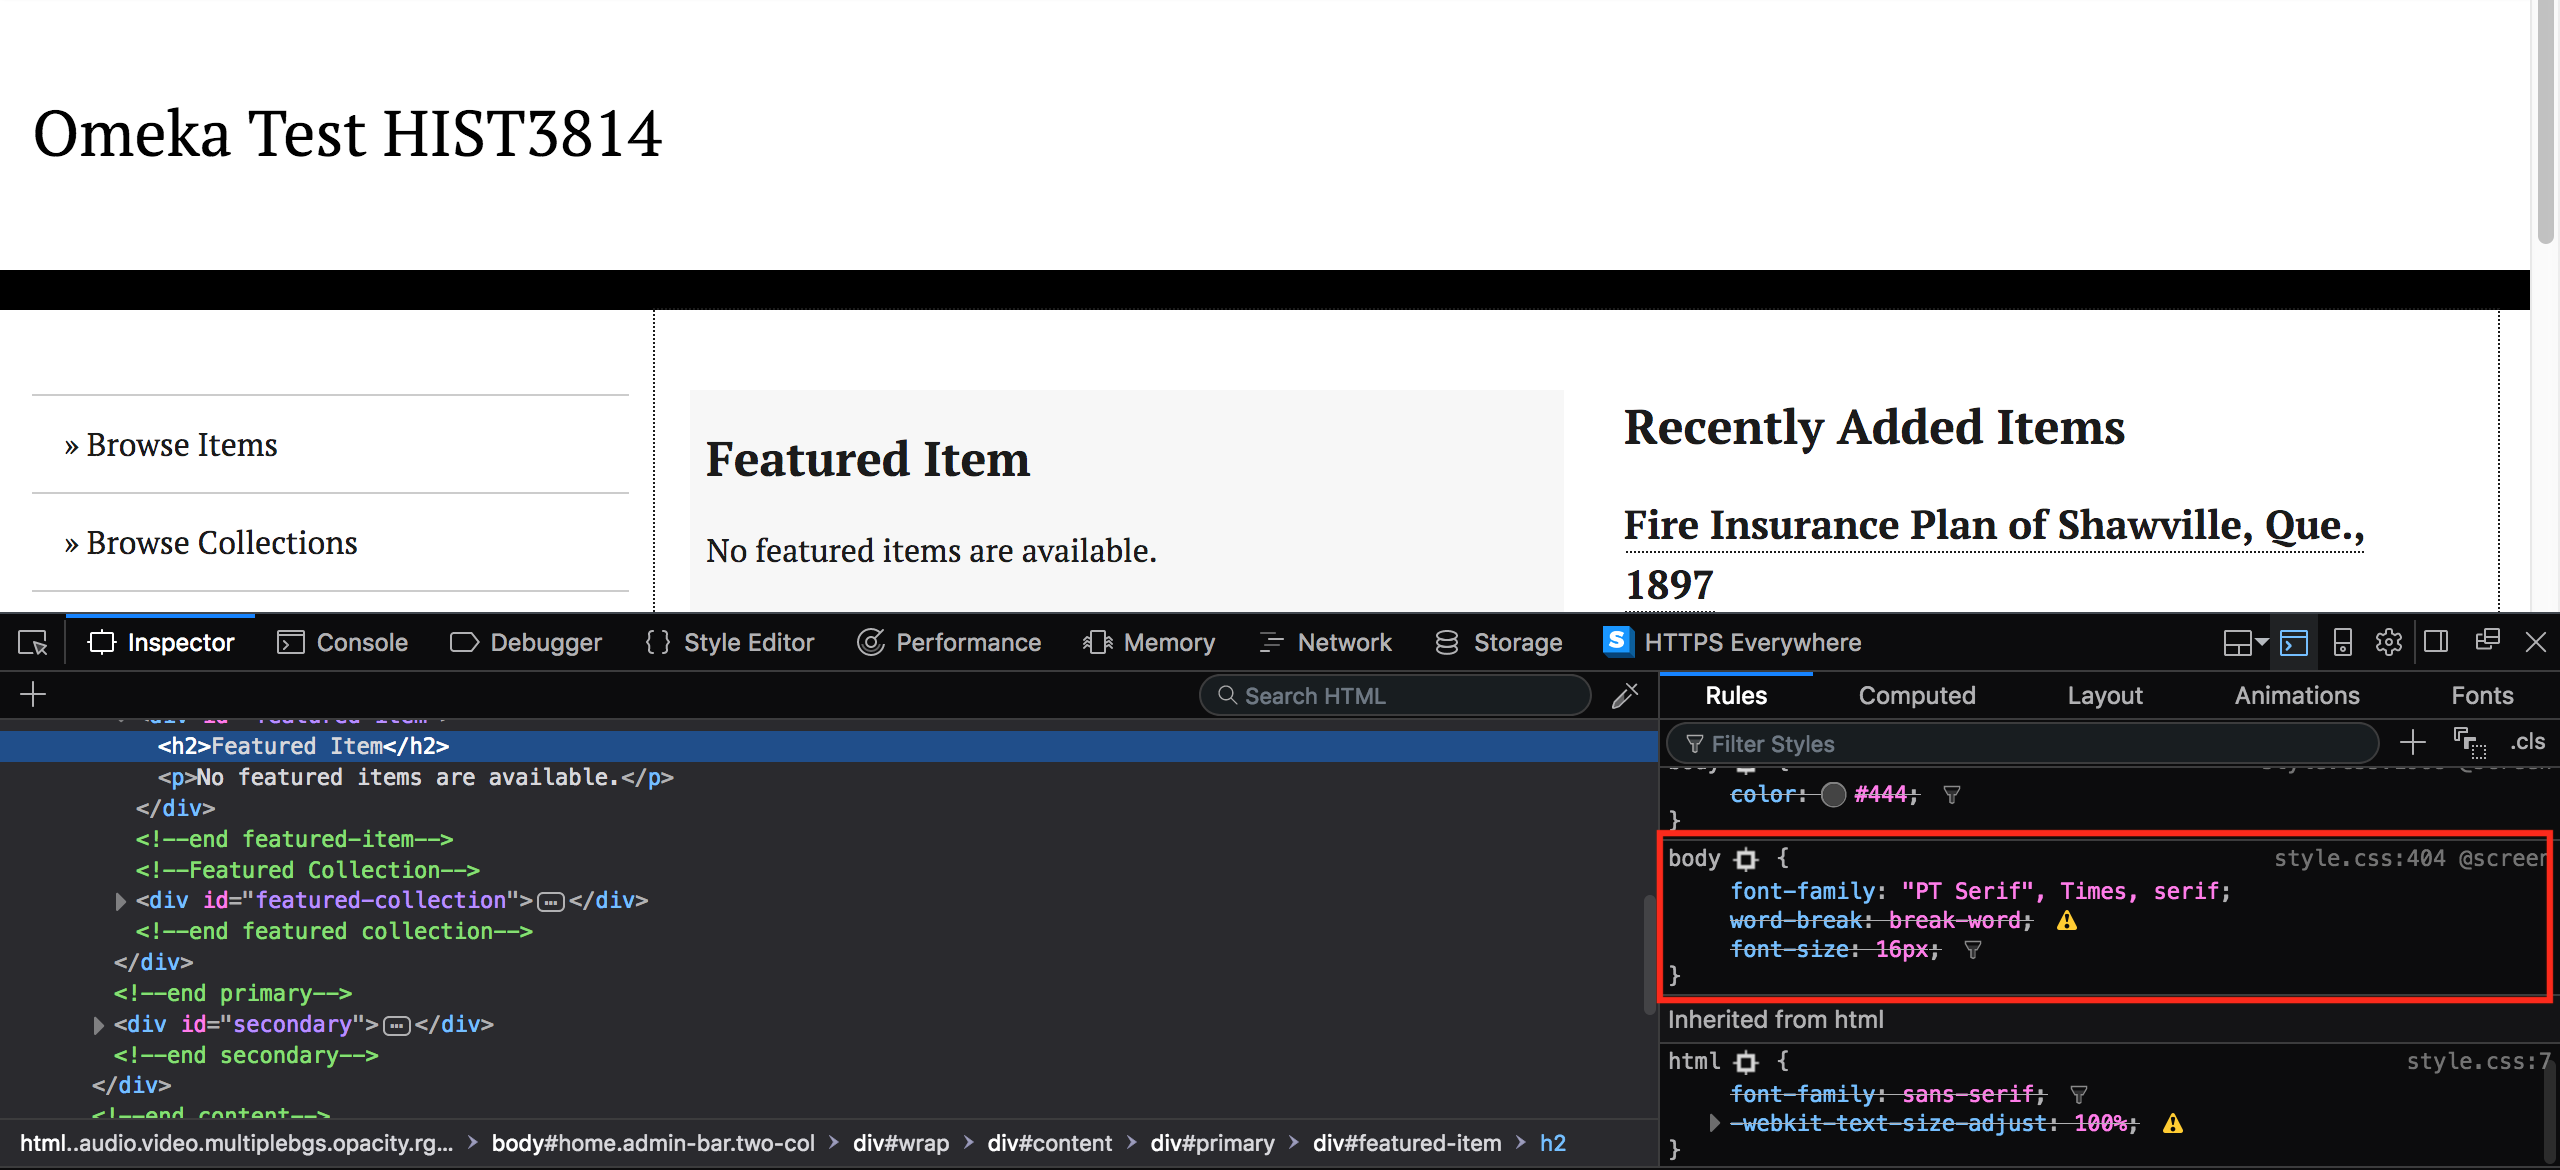
-
Go to Google Fonts to choose a new, more readable font.
-
Search Roboto. Roboto is a clean, easy to read font.
-
Click the red plus sign to select the font. It will add to a queue below.
-
Click the black queue bar.
-
Scroll to where it says Specify in CSS.
-
Copy the text that says
font-family: 'Roboto', sans-serif;. We will add this rule to our CSS file.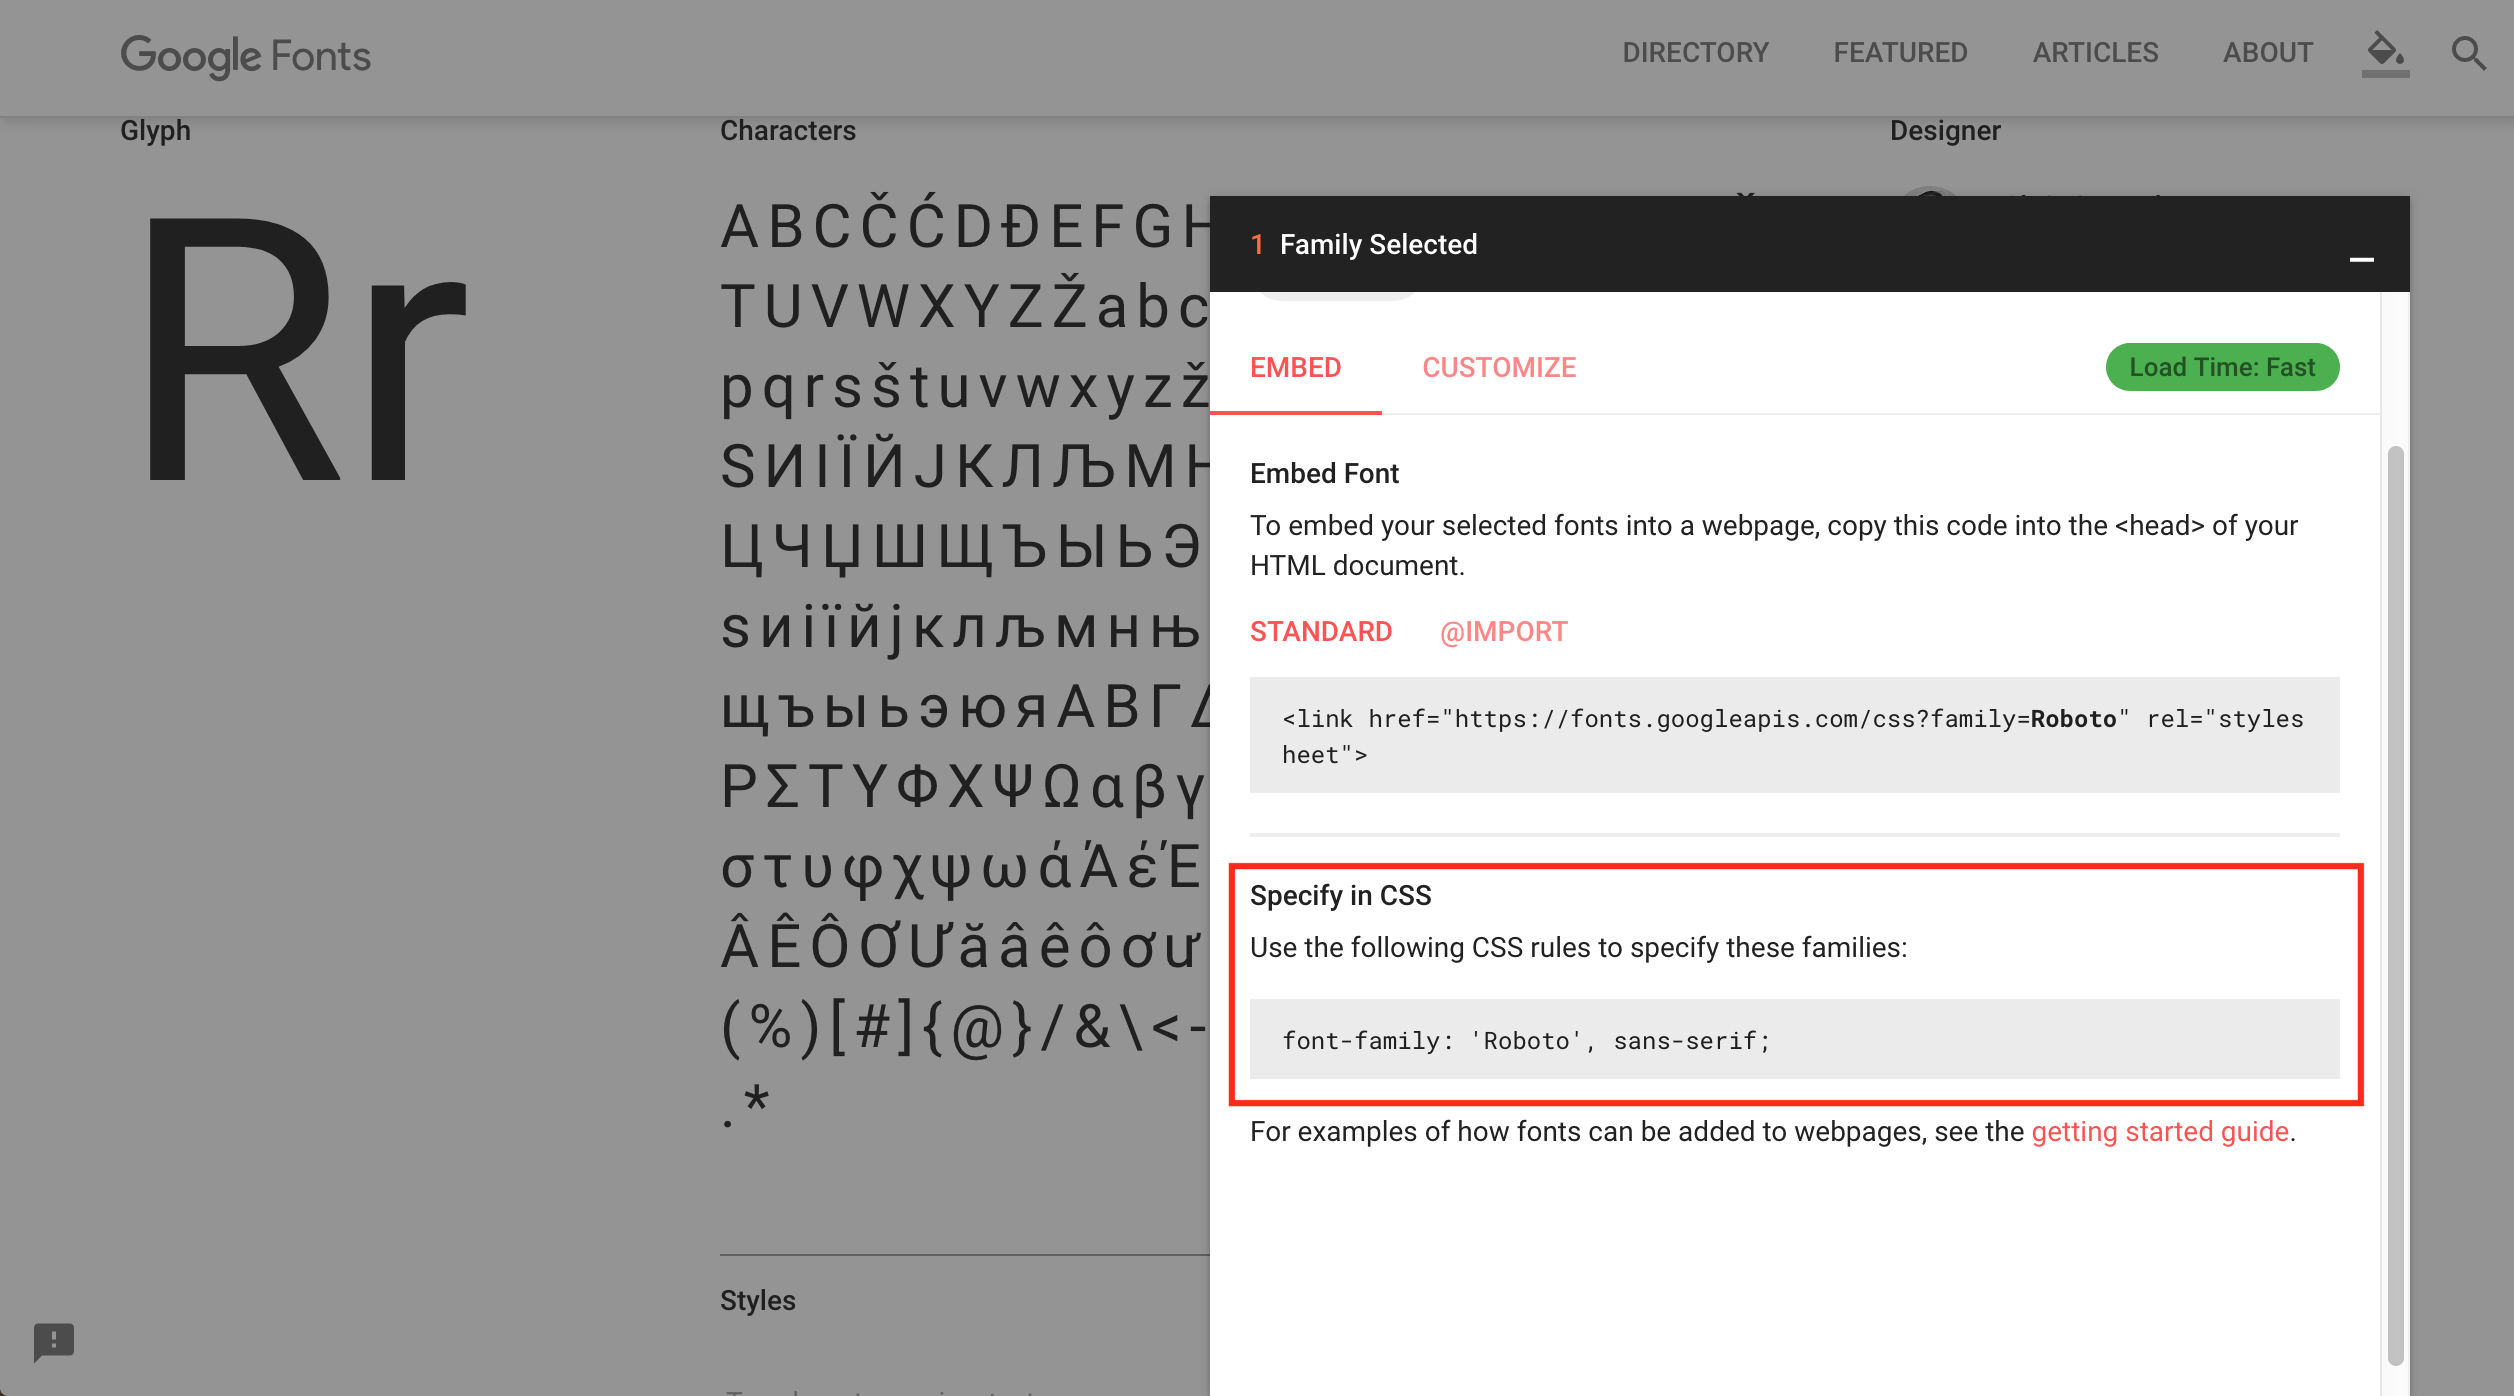
-
Navigate to your cPanel home page and select File Manager at the top of the page.
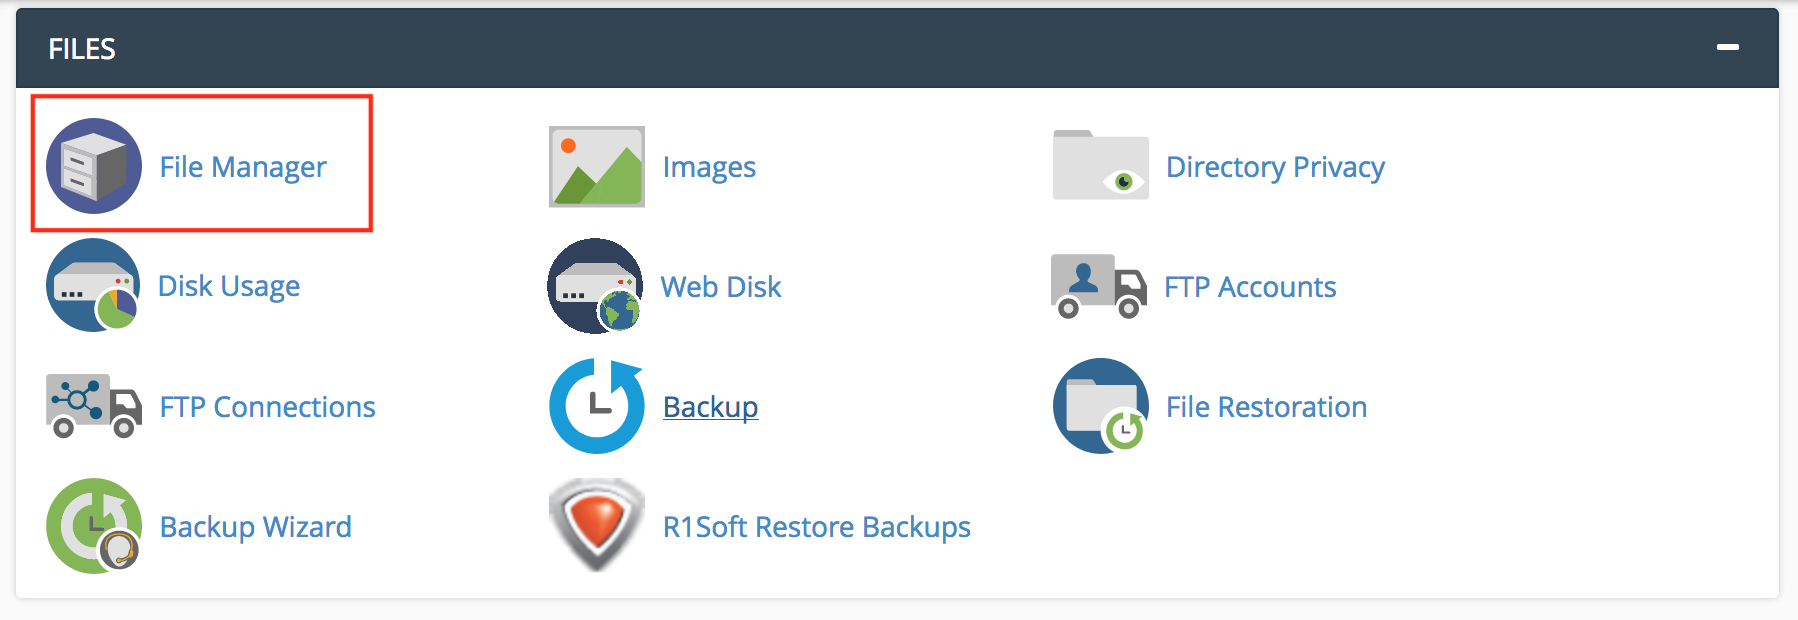
-
On the left side click on the folder for your Omeka site. The folder should have the same name as your domain. For instance, if your site is called
omeka.mysite.com, the folder will be calledomeka.mysite.comunless you changed the name earlier. -
Double click each folder until you are in the
cssfolder: Themes >> Default >> css -
Right click
style.cssand select Edit. Reclaim Hosting has some great editing tools within the cPanel so you don't have to make updates within your desktop text editor and then reupload the files.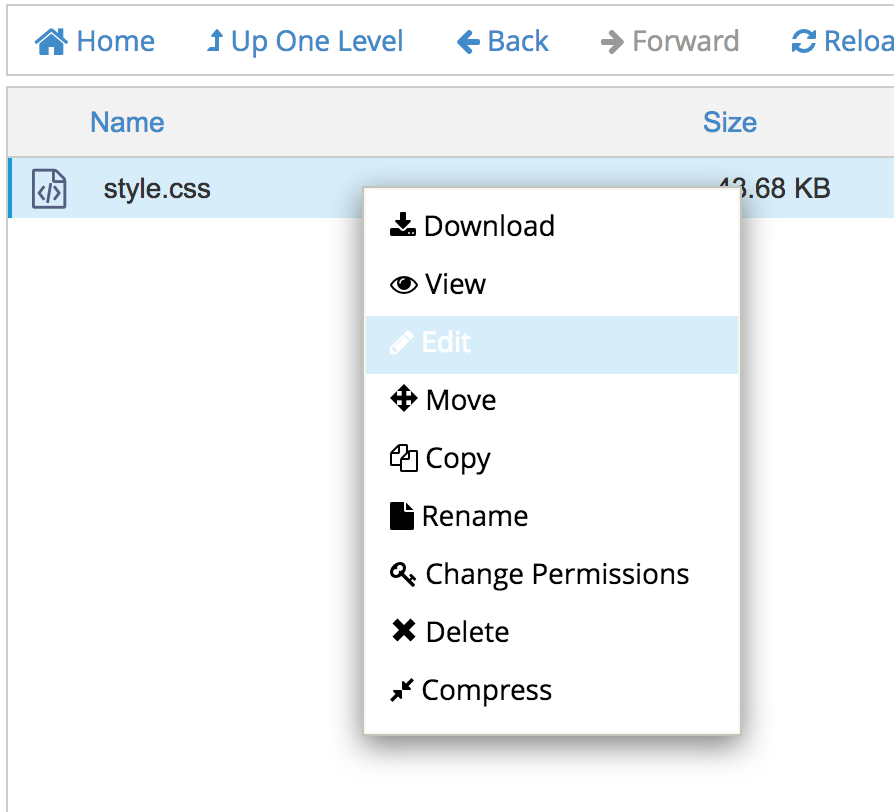
-
Search
font-familyby hitting ctrl-f (Windows) or cmnd-f (Mac). We ONLY want to change the rules that sayfont-family: "PT Serif", Times, serif;.
-
Use the search to replace each instance of
font-family: "PT Serif", Times, serif;withfont-family: 'Roboto', sans-serif;.
-
Click the blue Save Changes button at the top right of the editor.
-
Navigate to your Omeka site and refresh the page. Notice the font changes from PT Serif to Roboto.
Before (default PT Serif font)
After (updated Roboto font)
-
Use your browser's inspector to find out the style rules of any specific element on a web page.
-
If you make any major mistakes and want to start from scratch, you can copy the original
style.cssfile from GitHub, paste it into your file, and save the changes. This will revert it back to the original style.
NB It is important to note that for our purposes, we edited the default style.css file directly. This was to introduce you to CSS and making changes to the source code. Typically, you'd want to add a new file called, for example, custom.css and specify the path to that file in our source code. That way you keep your own changes distinct from the default source code files. However, that would involve editing different PHP rules which is beyond the scope of this option. This is very important for making upgrades. If your theme ever upgrades, you will lose all your changes if you only edited the default style.css. This applies to any file type. Therefore, you may want to keep a copy of your changes somewhere handy, like on your desktop.
More Resources
Below are more resources, tutorials, and things to explore.
Accessibility and Design
While most of this applies to websites, think also about how the general principles apply to other ways and means of telling our data stories.
- How People with Disabilities Use the Web
- Web Content Accessibility and Mobile Web
- Accessibility in HTML5
- Web Accessibility Evaluation Tool
- Considering the User Perspective
- Constructing a POUR Website Percievable, Operable, Understandable, Robust. Applies much wider than design of websites.
- Checking Microsoft Office-generated documents for accessibility
Infographics and Storytelling
Infographics
- The Difference between Infographics and Visualizations
- Design hints for infographics
- Piktochart
- Infogr.am
- Easel.ly
Storytelling
ManyLines
ManyLines is an application that allows you to create narratives from network graphs. In essence, you upload a network file in .gexf format (which you can export from Gephi) and it renders it on the screen. There are some layout options to make the graph more intelligible. Then, you take a series of snapshots zoomed in on the graph in different places, and add text to describe what it is that's important about these networks. The app puts a Prezi-like wrapper around your snapshots, and the whole can then be embedded in a website or be used as a standalone website. Check out my first attempt on medialab.
You can also embed nearly anything in the narrative panels — Youtube videos, timeline.js — as long as you know how to correctly format an iframe.
To give this a try, why not use the Texan Correspondence network we generated in earlier modules? Export it in .gexf format from Gephi, import to ManyLines, and go! The interface is fairly straightforward. Just follow the prompts.
Caveat Utilitor I don't know how long anything made with ManyLines will live on their website. But, knowing what you know about wget and other tools, do you see how you could archive a copy on your own machine? ManyLines is available on GitHub so you can certainly use it locally.
Leaflet
Maps can be created through a variety of services (TileMill, Carto and mapbox for instance). These can then be embedded in your webpages or documents. Often, that's enough. But sometimes, you'd like to take control, and keep all the data, all the map, under your own name, in your own webspace. Visit the gentle introduction to using leaflet.js in our supporting materials to make, style, and serve your maps. Also visit a template on my GitHub repository for mapping with leaflet, drawing all of your point data and ancillary information from a CSV file. Leaflet also has a list of background maps you can use.
Leaflet in the field: Pembroke Soundscapes Project
Visit the Pembroke Soundscapes Project for an example of an academic historical project using Leaflet. This project uses an interactive map with sound clips to explore the industrial history of Pembroke, Ontario.
Designing Maps with Processing and Illustrator
Nicolas Felton is a renowned designer. Watch his 90 minute workshop on Skillshare.
NB I do not use Processing or Illustrator, but Processing is free and Inkscape can do many of the things that Illustrator does.